The post Chai Chocolate Chip Cookies appeared first on Cooking is Messy.
]]>
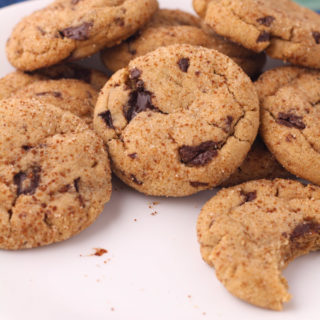
I’ll just say it – I’ve been in a cooking rut. For dinner, Ryan has been the more adventurous cook while I’ve stuck to old favorites like beginner chicken dinner, baked salmon, and pad thai. I’ve barely been baking either. This winter I’ve applied my creative energies to knitting and have been letting my cookbooks go dusty. However, there is one new recipe in my life. It’s this one for chai chocolate chip cookies.
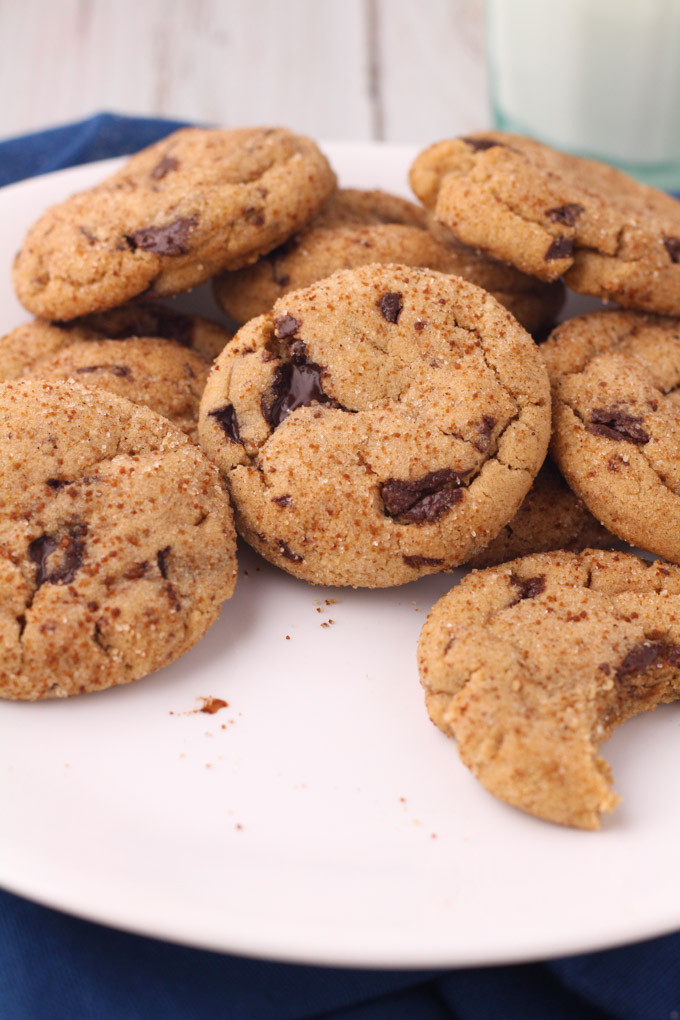
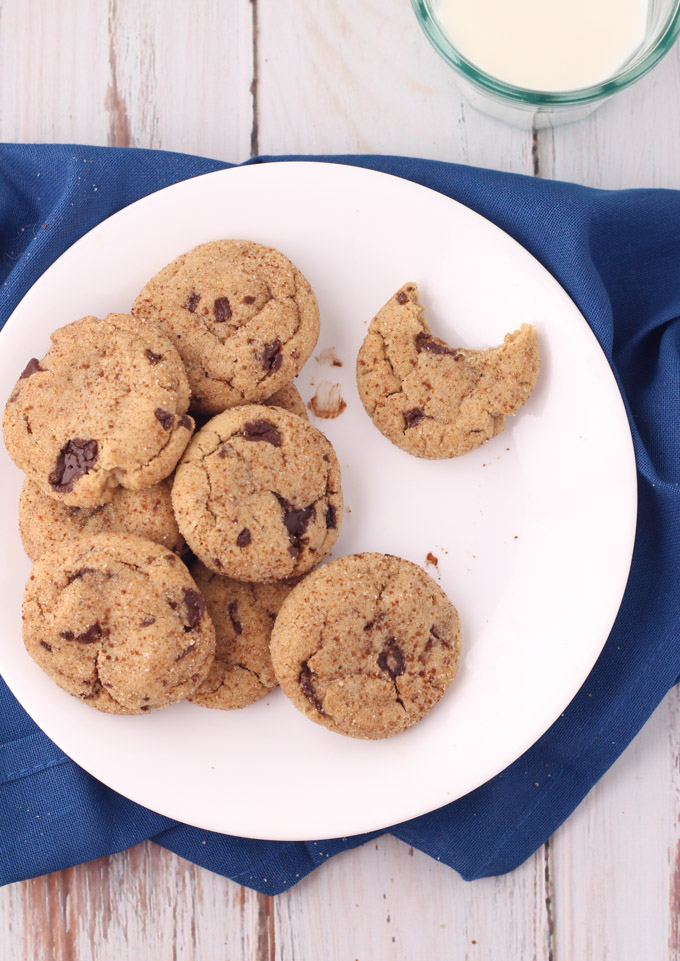
Cookies are my absolute favorite things to make, so I love trying something new. This recipe has all the comfort of a chocolate chip cookie but paired with the warming spices of chai it’s slightly elevated. It’s been perfect for the chilly days we keep having. I’m longing for spring, and while DC keeps getting snippets of warm weather, it doesn’t seem to stay put!
While I’ve called this recipe, chai chocolate chip cookies, I don’t actually use chocolate chips. You totally can, but currently I’m into roughly chopped bars of dark chocolate. I like doing this because it creates cookies with uneven globs of chocolate scattered throughout. Sometimes a lot of chocolate, sometimes a little, and that’s a delightful surprise. As well, chocolate bars don’t have the stabilizers of chips, so the chocolate melts into a gooey decadent blobs.
I also like this recipe because it’s a little bit flexible based on what I have in my pantry. I’ve been making it with some whole wheat flour because I like the heartier, nuttier flavor it gives. Alternatively, you can use 100% all-purpose flour if that’s what you’ve got on hand. As well, you can use 100% granulated sugar – but I enjoy doing a mix of white and brown sugar for a more rich flavor. In fact, when I haven’t had enough of either sugar, I’ve also used coconut sugar! Go with what you have and I’m sure you’ll end up with a delicious cookie.
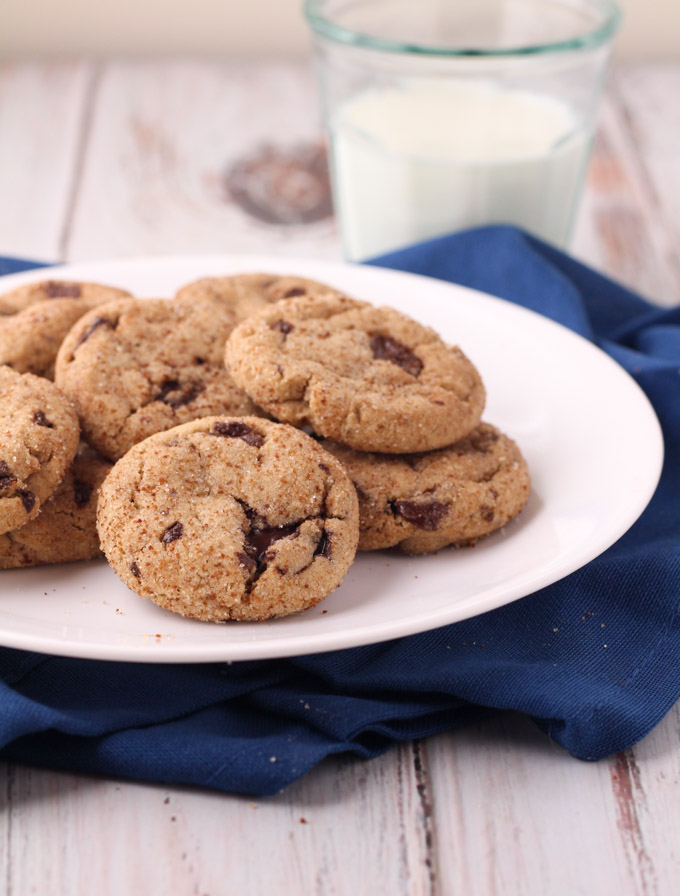
Last thing – for aesthetic purposes I like to roll the dough into balls and then gently flatten with the bottom of a glass. I think it makes the cookies look really nice once baked. However, you can plop small heaps of dough onto a baking pan and the cookies will bake up fine – just a little bit thicker and lumpier. Again, they’re pretty flexible cookies.
Hopefully, when spring is unequivocally here and the farmers markets are open again, I think I’ll be inspired to shake off my cooking rut. Until then, I’ll stick to baking cookies – and that’s not so bad!
Adapted from My Baking Addiction.
 Messy level: Not really messier than any other drop cookie recipe. The dough gets rolled in the spices, and that can lead to spills on the counter, though that’s not so hard to clean up!
- 2 cups all-purpose flour
- ¾ cup whole wheat flour
- 1 teaspoon baking soda
- ½ teaspoon baking powder
- ½ teaspoon salt
- 1 cup granulated sugar
- ¾ cup brown sugar
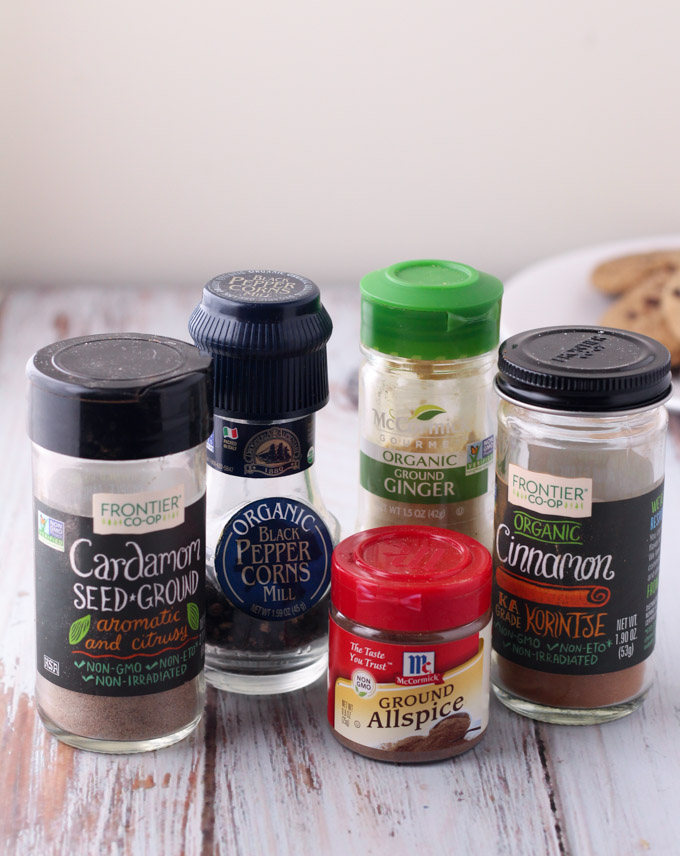
- 2½ teaspoons ground cinnamon
- 1 teaspoon ground ginger
- 1 teaspoon ground cardamom
- ½ teaspoon ground allspice
- ¼ teaspoon finely ground black pepper
- 1 cup unsalted butter, softened
- 1 egg
- ½ teaspoon vanilla extract
- 4-6 oz dark chocolate bar, roughly chopped
- Preheat oven to 350°F/180°C. Line a baking sheet with parchment paper or silicone mat.
- In a large bowl, stir together all-purpose flour, whole wheat flour, baking soda, baking powder and salt.
- In a large bowl combine granulated sugar, brown sugar cinnamon, ginger, cardamom, allspice and black pepper. If you're going to use a stand mixer, do this step in the bowl of your stand mixer.
- Scoop out ¼ cup of the sugar-spice mixture and put in a small bowl. A cereal bowl or something similar will do fine. You need this for later to roll the cookie dough in the spices.
- Take the large bowl with your sugar-spice mixture and add in the butter. Beat using an electric mixer or the paddle attachment if using a stand mixer. Beat for 3 minutes, or until everything is light and fluffy.
- Add egg and vanilla extract to the bowl and beat until incorporated.
- Slowly pour in flour mixture until just combined.
- Gently fold in the chopped chocolate until evenly mixed throughout the dough.
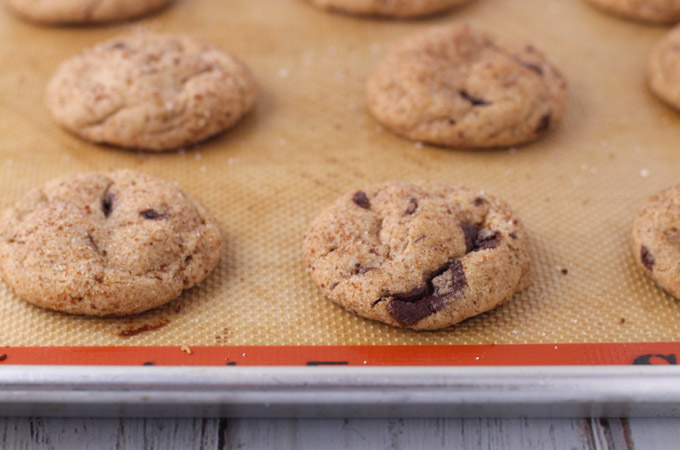
- Scoop out small balls of dough (about 2 teaspoons, or the size of a ping pong ball). Roll dough into balls and then coat the dough with the reserved sugar-spice mixture.
- Place dough on baking sheet about 1½ inches apart.
- If desired, use the bottom of a flat glass (or your hands) to gently press the cookies until they are ½" thick.
- Bake for 10-12 minutes.
- Let stand on baking sheet for a few minutes before putting on a wire rack to cool fully.
The post Chai Chocolate Chip Cookies appeared first on Cooking is Messy.
]]>The post Sous Vide Chocolate Mousse appeared first on Cooking is Messy.
]]>
Is nearly a month into January too late to say happy New Year? Since it’s the first time I’m posting in 2018, I’m deciding it’s not. So… Happy New Year!
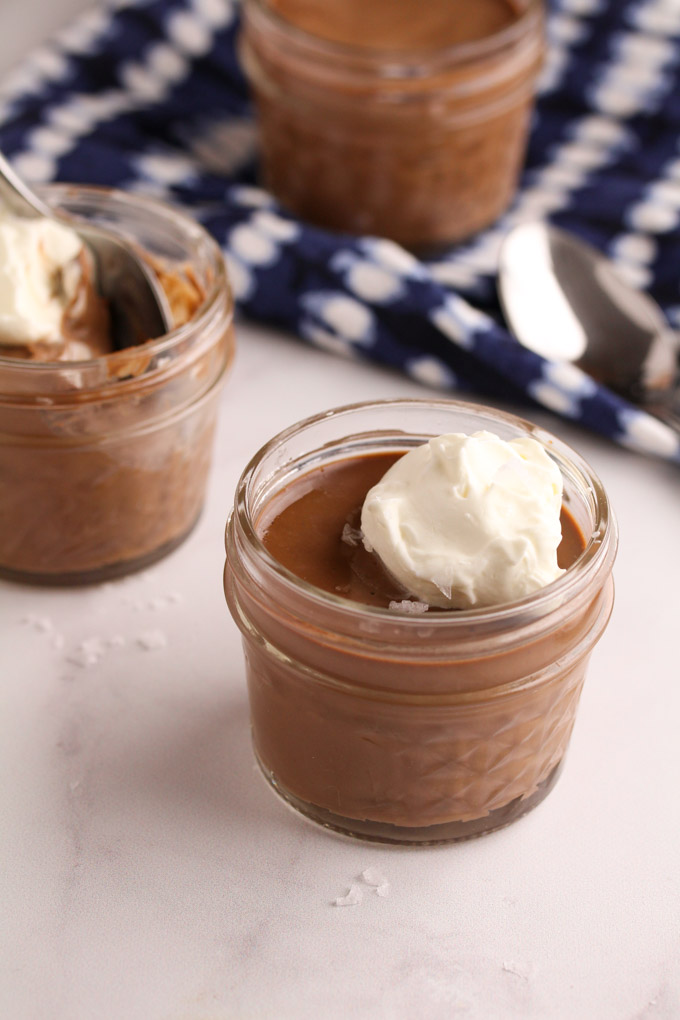
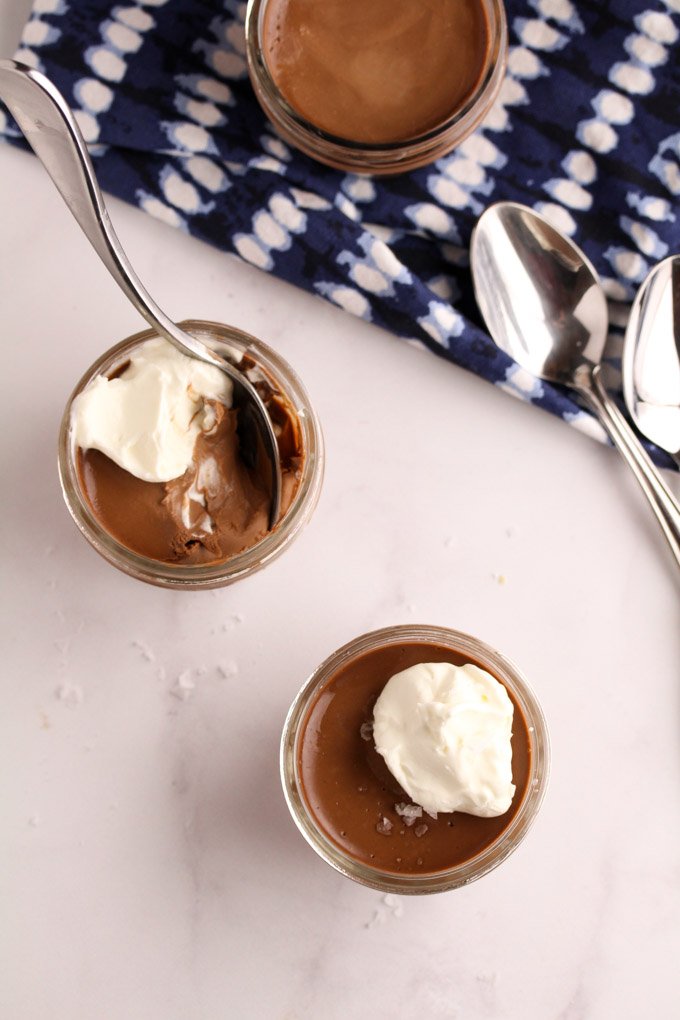
I know January is usually a time where people are hitting the gym, going sugar free, and working to get healthy after eating all the indulgent holiday foods. And I totally get that. I too am trying to get into a healthy mindset. However, January is also a time for fresh starts and trying new things – and that’s where my new sous vide and today’s recipe for sous vide chocolate mousse enters the picture.
As an adult, I don’t usually get a lot of toys for Christmas. Ok, I did get a stuffed animal… but nowadays my toys are things for the kitchen. I get excited by kitchen gadgets in nearly the same way my nephew got psyched for his train table on Christmas morning. This Christmas, Ryan got me a sous vide machine, which had been the thing I’d been dreaming of and never thought I’d really get. When I opened it, I did a lot of, “no! really?!” and “wow,” and “I never thought I’d have one!” Then obviously, after all the disbelief, I said, “what should I make?!”
Perhaps, here is where I’ve lost you. I’m gushing about a sous vide, and maybe you’re thinking, “Mariel, what’s a sous vide?” Let me explain – and also check out the photo below to see it in action. Sous vide is French (clearly), and means “under vacuum.” Food is placed in a vacuum sealed bag or glass jar and then cooked in a water bath at a low, regulated temperature, for a long time. The sous vide is the mechanism that goes in the water, circulates it, and keeps the water at a consistent temperature.
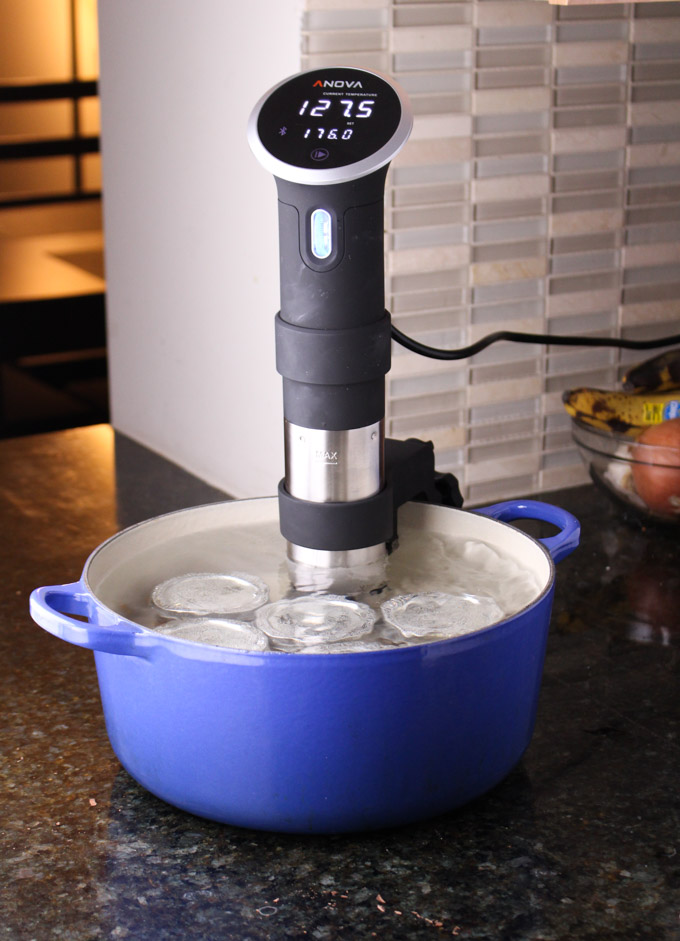
What makes this thing awesome, because I know it doesn’t sound particularly special, is that the food stays at that consistent temperature. This means, meats, eggs, and other finicky items cook evenly throughout and don’t over cook. Steaks don’t accidentally become well-done on the outside but cold and rare on the inside. With a sous vide, you can make a medium steak perfectly every time because it’s heated at an even temperature all the way through. Egg yolks will stay runny if that’s what you want. And custards will be silky smooth instead of too thick and dense. Maybe you can do this all on the stove or in the oven (but I can’t always!) – and sous vide is also set it and forget it which is awesome for weeknight meals.
This is a gadget that at one point was large, expensive, and only for professional kitchens. Now it’s pretty compact and fairly affordable making it accessible to regular home cooks like me (and you). And since I got mine, I’ve been cooking everything. Steaks, chicken, halibut, shrimp, lobster tail (which I’d never cooked before!), potatoes, and even sous vide chocolate mousse. Everything has been super delicious, easy to clean up (you know I love that!), and fun to make.
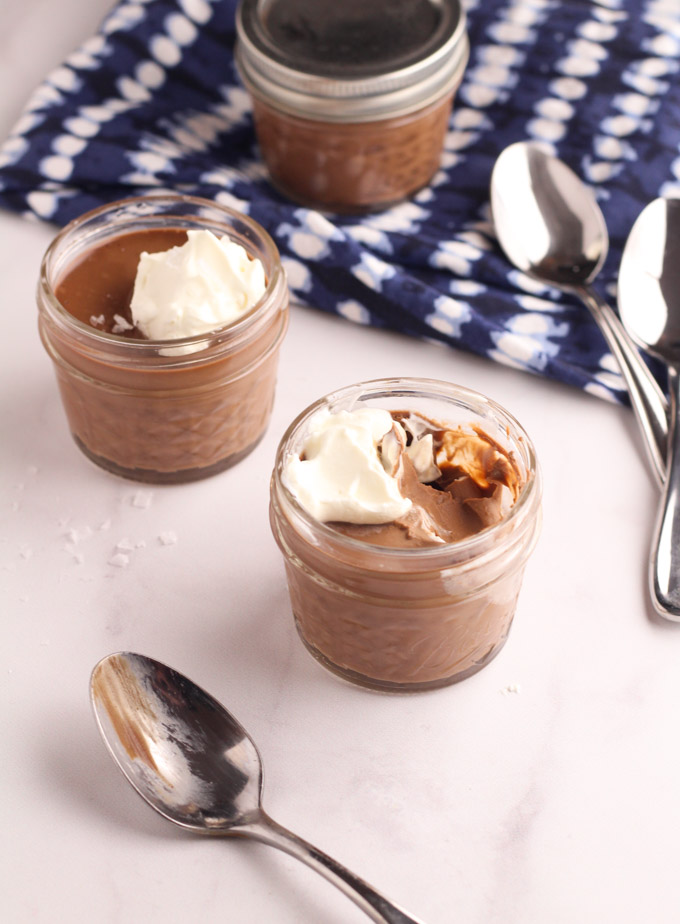
What I love about this recipe, is that the mousse is cooked in individual cups. That makes it perfect for gifts or hosting a party. So easy and adorable. Only word of warning, put the mason jars in the water as it heats up so that the glass can come to temperature with the water and that will keep it from breaking.
Once cooked, you’ll need to let it chill but at room temperature the sous vide chocolate mousse is rich in flavor but silky in texture. Cold straight out of the fridge, the mousse is dense and the slightly bitter flavor of dark chocolate is very pronounced. It’s good either way, but best topped with whipped cream. A little bit of crunchy salt sprinkled on top doesn’t hurt either.
I’m enjoying starting the year off with some new culinary adventures. I’ve also got a list of foods I’d like to try making for the first time this year including: linguine with clams, vanilla extract, red pepper and Gouda bisque, and baklava. Any foods you’re going to try this year? And recipe you’d like to see on the blog in 2018? Let me know in the comments below!
Adapted (barely!) from Sous Vide at Home. If you have a sous vide machine, get this book. It’s awesome and the photography is beautiful.
 Messy level: While the sous vide machine is easy to clean, and the mousse is made in its serving container, this is a two spoon recipe because you do have to do a little work on the stove before the official cooking begins.
- 1½ cups heavy cream
- 4 ounces bitter sweet chocolate, roughly chopped
- 3 tablespoons granulated sugar
- 1 teaspoon vanilla extract
- pinch of salt
- 4 egg yolks
- whipped cream and flaky sea salt, optional toppings
- 5, 4oz mason jars
- In a small sauce pan, heat the heavy cream to a simmer. Once it is simmering, remove from the heat.
- Whisk the chocolate, sugar, vanilla, and salt into the heavy cream. Whisk until smooth. Make sure you get into the edges of the pan - chocolate likes to get stuck there!
- Add the egg yolks one at a time. Mix each yolk in completely before adding the next yolk. By the end the liquid will be a rich and silky texture.
- For easy pouring, transfer the liquid to a liquid measuring cup or pitcher.
- Pour the chocolate liquid evenly between the mason jars. Put the lid on and tighten so it's snug, but not so tight that it's later going to be impossible to twist off.
- Put your sous vide in a large pot. Add the water until just above the minimum water line. Then, gently place the jars into the pot, making sure they are touching the bottom.
- Set the bath to 176°F/80°C. When the water gets to temperature, cook the chocolate for an additional 1 hour.
- After an hour, use tongs to remove the jars from the water. Place the hot jars on a kitchen towel and let cool slightly (10 minutes). Putting the hot and wet class jar on a cool counter could potentially break the glass, so it's good to put it on a towel first.
- Put the jars in the fridge for 1.5-3 hours. This will help the mousse set fully. If you take it out closer to 1.5 hours the mousse will still be a bit warm, light, and silky. If you let it sit in the fridge longer, the mousse will get cool, denser, and very rich. After 3 hours to get it back to silky and light, just leave the mousse out at room temperature for about 20 minutes.
- Serve directly from the mason jar with a soon. Feel free to top with whipped cream and/or a sprinkling of flaky sea salt. Also good just plain!
The post Sous Vide Chocolate Mousse appeared first on Cooking is Messy.
]]>The post Peanut Butter and Jelly Thumbprint Cookies appeared first on Cooking is Messy.
]]>
Back in July, I think I wrote that I was going to start working out. Before, we get to the recipe, I wanted to take a second and do a smidge of bragging. I have been working out and sticking with it. That’s something I’ve never done before.
In fact, I’ve lost six pounds, I can hold a plank position for nearly 2 minutes (while yelling “You can do this!” aloud to myself), and in the right light I have a shadow of six-pack ab definition. It’s exciting, but I still have a big sweet tooth. I’m a girl who likes dessert and wants to indulge. And these peanut butter and jelly thumbprint cookies are pretty great.
Cookies are my favorite thing to bake, but I while on my health kick, I’m looking for dessert I can eat and not feel too guilty. Ok, so it’s still a cookie, they aren’t a healthy food. But at least there’s a teensy bit of nutritional value in these cookies. First, there’s barely any added butter. Peanut butter, while caloric, is filling protein and a healthy fat. Plus, I used whole wheat flour so it’s got that going for it. Depending on the type of peanut butter and the type of jelly you use, each cookie can clock in between 60-80 calories. Not so bad!
I also like these cookies because I had jelly to spare. Somehow this summer, I spent my time developing a collection of unusual flavors of jelly. In June, I made currant jam. Sometime in July I think, Ryan and I got blueberry jelly in our farm share. Then in August, we went to a wedding in Lancaster, PA and I had to buy a cute little jar of strawberry rhubarb jam from the market. We don’t have a toaster, so that jelly wasn’t making it onto bread. Instead, it was in need of a peanut butter cookie home.
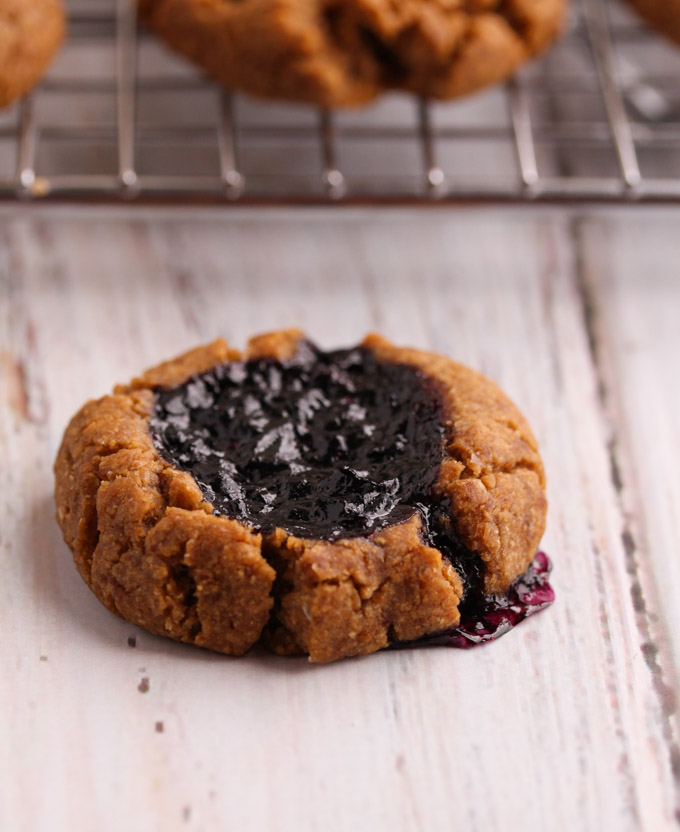
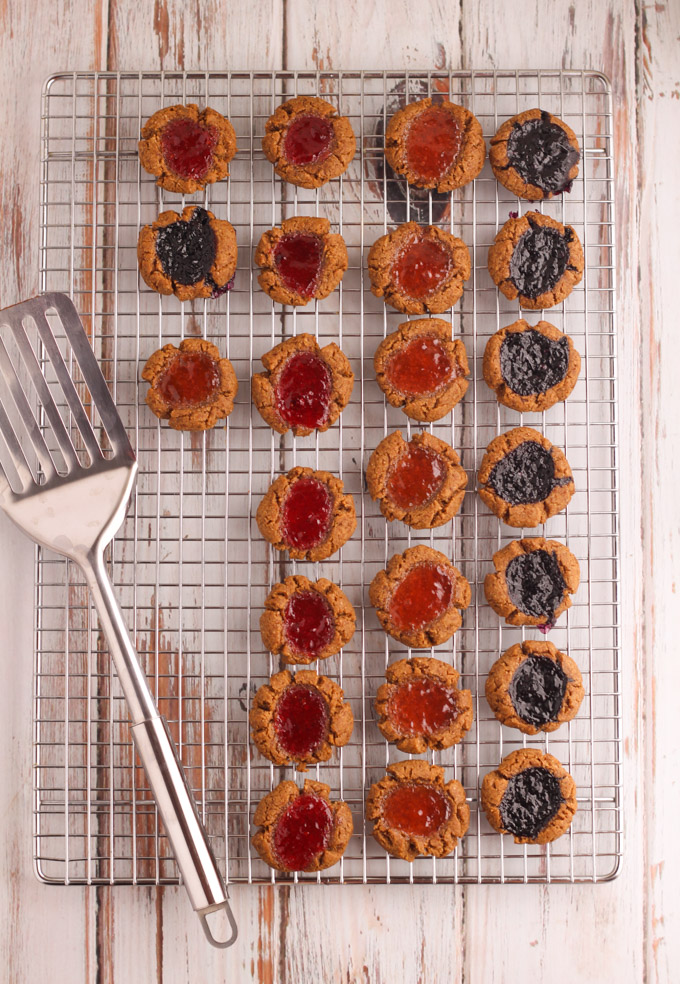
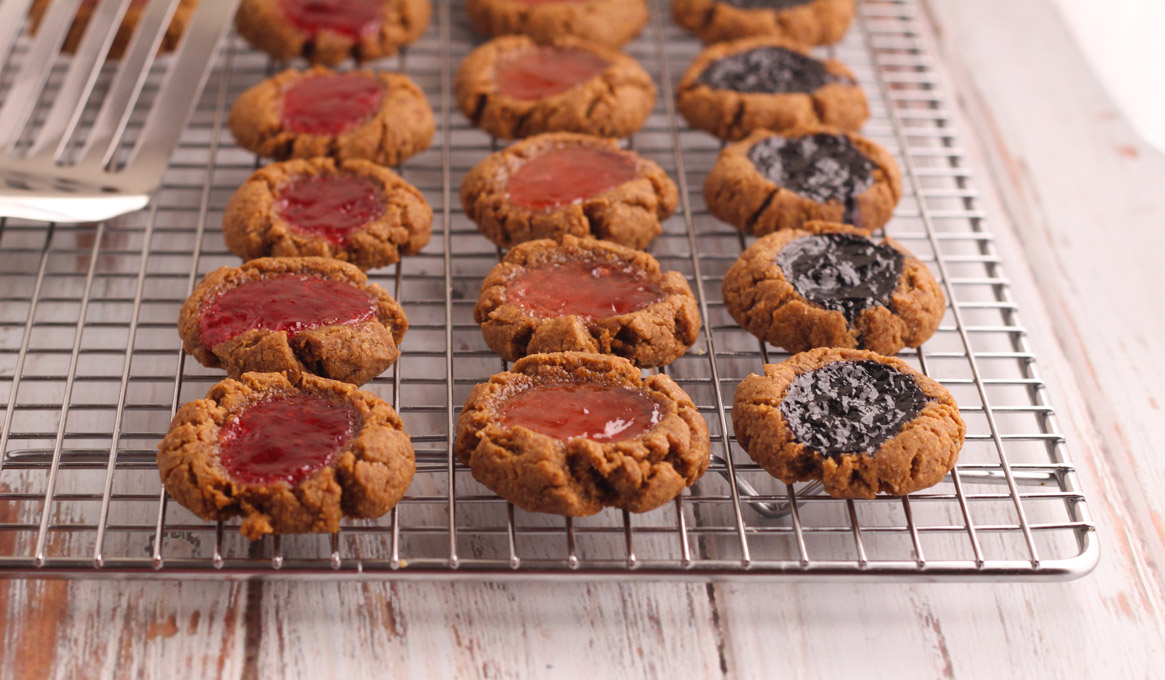
And aren’t the jellies so pretty when baked into the cookies?! Like shiny little jewels. The color of the jelly is so alluring, it’s hard to choose which one to eat first. So why choose? I think it’s best to try one of each, you know, for quality control.
What other flavors of jelly would go with these cookies? If you want the classic flavor of a pb&j, you should probably go with strawberry or grape. But if you’re more adventurous in your pairing let me know! Apple? Blackberry? Plum? It all sounds good to me. Try out some combos and let me know! I’d love to try this again with new flavors, and thereby grow my jelly collection.
Adapted from Amy’s Healthy Baking.
Messy level: Not very messy! You will get your hands a bit dirty shaping the cookies and making the thumbprint. However, I find that to be a fun mess.
- ½ cup/ 150 grams jelly in your favorite flavor (about 2½ tbsps each for 3 flavors)
- 1 cup/ 120 grams whole wheat flour
- ¾ teaspoon baking powder
- pinch of salt
- ½ tablespoon / 7 grams butter, melted and slightly cooled
- 1 egg white
- 1 teaspoon vanilla extract
- ½ heaping cup/ 75 grams peanut butter
- ½ cup/100 grams brown sugar
- Preheat oven to 350°F/180°C.
- Line a baking sheet with parchment paper or a nonstick mat.
- Measure out your jelly and stir in a little to thin it a bit.
- In a medium bowl, mix together the flour, baking powder, and salt.
- Using a large bowl, mix together the butter, egg white, and vanilla.
- Add the peanut butter to the butter mixture. Stir until smooth.
- Add the brown sugar and stir until smooth.
- Slowly pour the flour mixture into the peanut butter mixture. Fold in until smooth.
- Divide the dough into 24 balls. Depending on the size of your pan they all might fit on one sheet.
- Use your thumb to press and indentation into the ball. If the edges get too crackly, you can use your fingers to pinch and press the edges back together.
- Fill the thumbprint with a small scoopful of jelly. The jam can come up to the edge of the thumbprint, but too full and the jelly will ooze out too much.
- Bake for 10-12 minutes, or until slightly darker around the edges.
The post Peanut Butter and Jelly Thumbprint Cookies appeared first on Cooking is Messy.
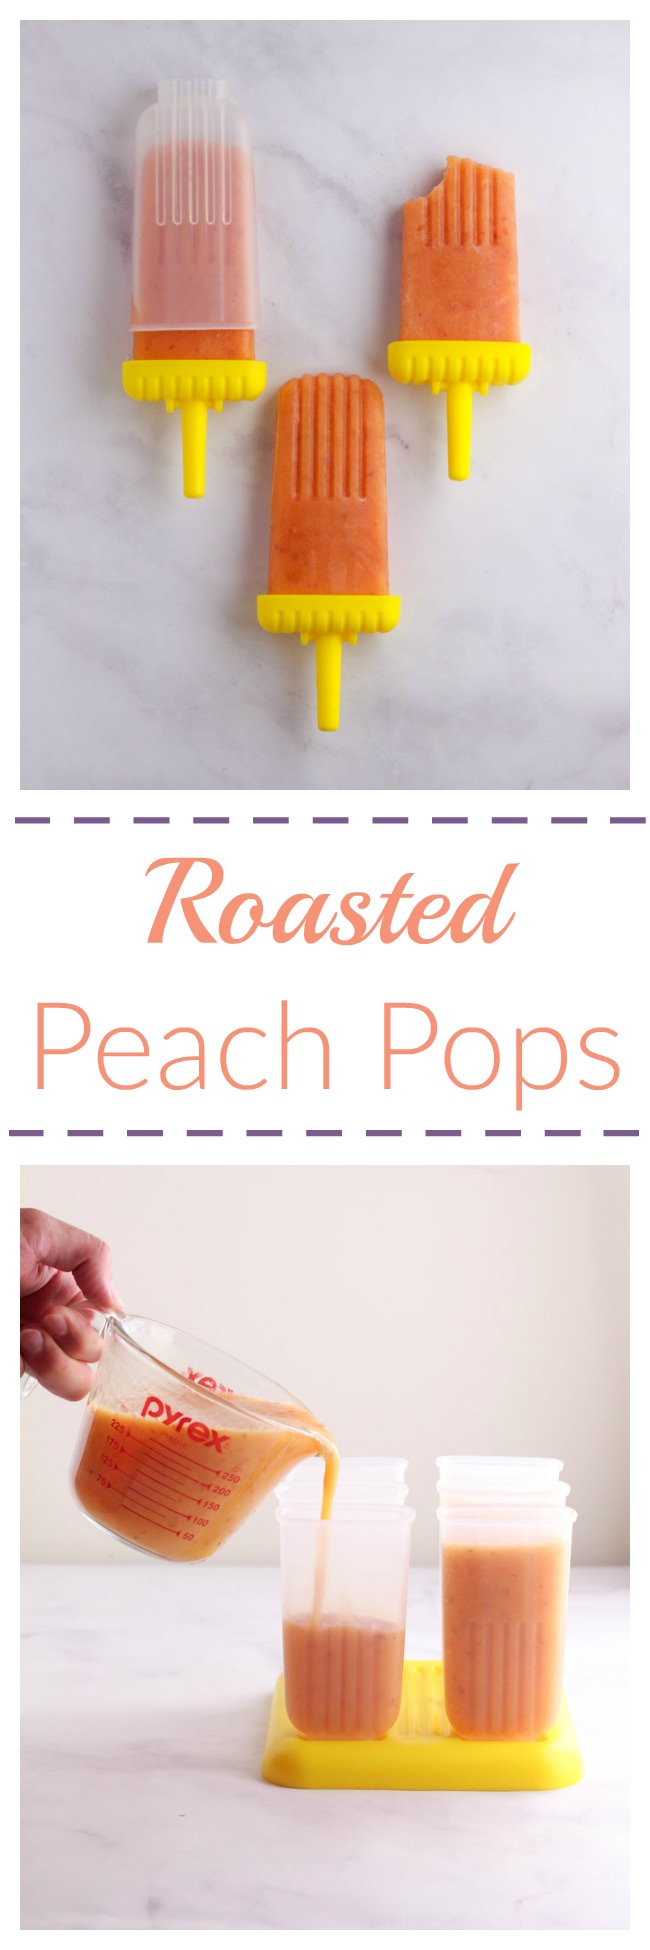
]]>The post Roasted Peach Pops appeared first on Cooking is Messy.
]]>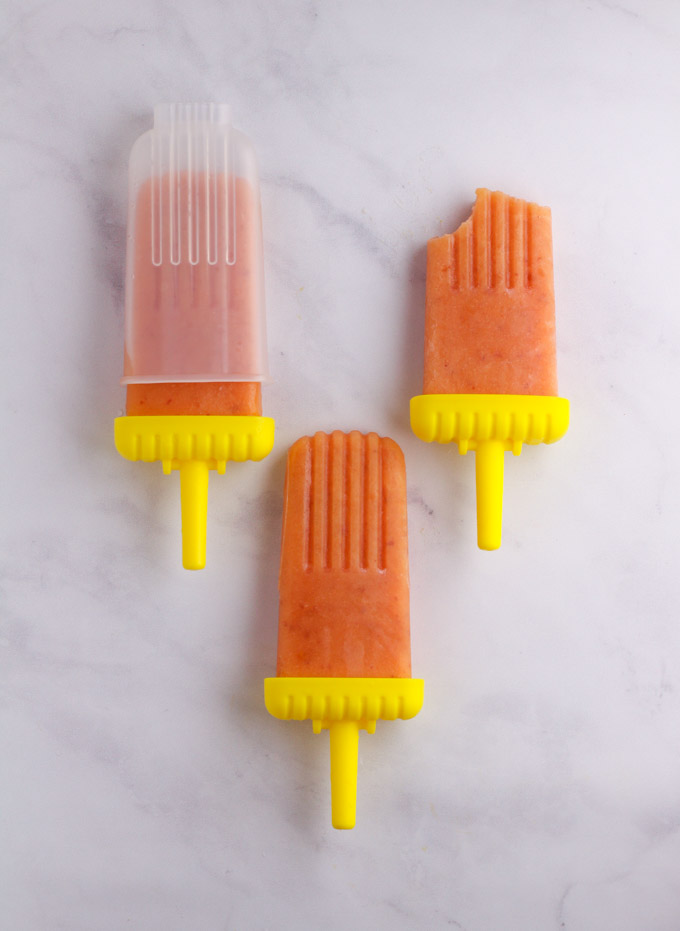
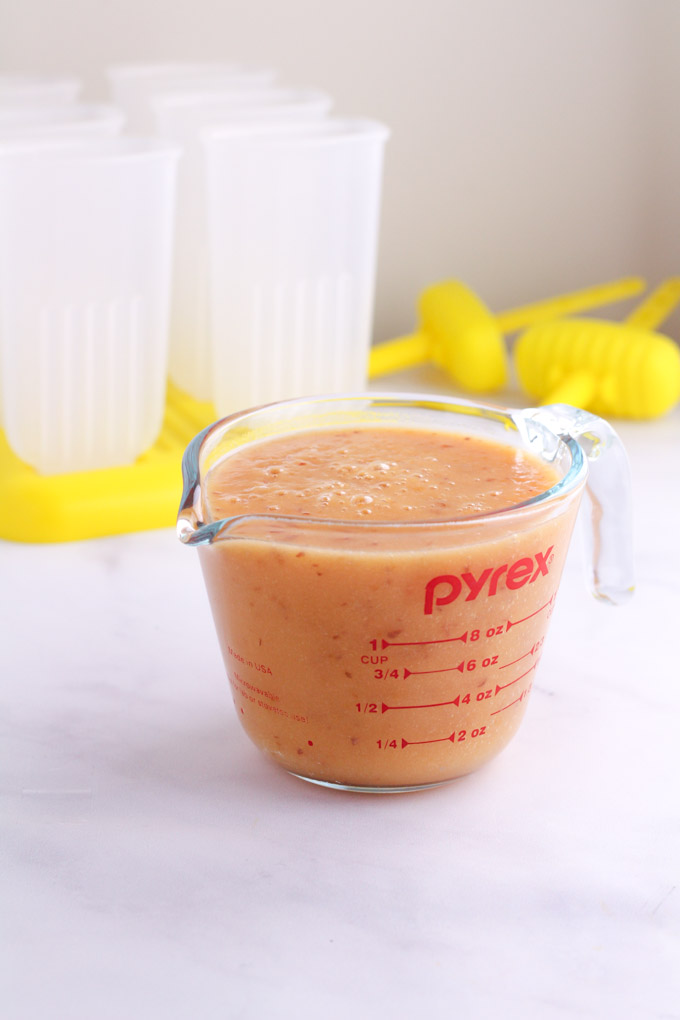
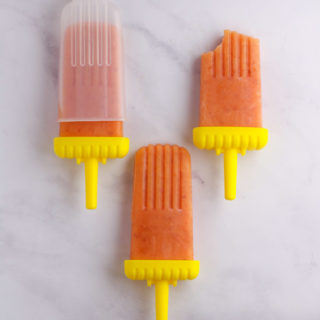
As I sit here writing this, it’s the evening of Labor Day Monday. I’ve had a good weekend, but I’ve got the Sunday blues (even though it’s Monday). Today marks the end of the long weekend, and worse, the end of the summer. I’m not quite ready for it to go. As much as I love crunchy leaves, boots, and cooler weather, I’m don’t want to say goodbye to hot days, beach vacations, and sundresses. Summer don’t go! I’m trying to hang on a little longer with this recipe for roasted peach pops. Not only is it a taste of summer, it might be the best thing I’ve ever made.
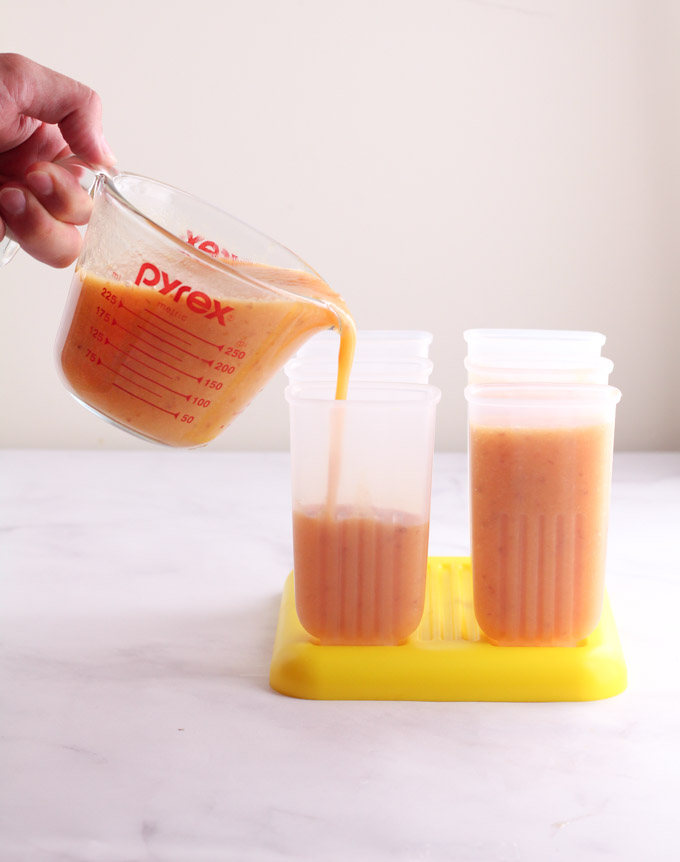
This summer has been my summer of ice pops. At the start of the season I bought two different kinds of molds. The one used in the photos is this set of 6 molds. Each pop is about 3 ounces. I also bought this smaller square pop mold
set. It seemed like too much when I was doing it, but I couldn’t help myself.
I wanted yummy, fruity, ice pops to keep the summer cool. I wanted them in the morning as I walked to work, in the evening after dinner, and as a midday treat on a hot Saturday. Over the last three months, I’ve made about a dozen different kinds. But today’s recipe is my absolute favorite.
I have made this recipe for roasted peach pops nearly half a dozen times this summer. For a few weeks in a row peaches kept showing up in the farm share bag. “Yes,” I’d think to myself, “more popsicles!” And I’d go home, make more, and somehow never get sick of them. Here’s the embarrassing secret behind this recipe: I drink any leftover puree that won’t fill up a mold. That’s how good this recipe is.
I stand by my earlier statement that this recipe is the best thing I’ve ever made. It seems hyperbolic to say that about ice pops, but it might be true. There are a few things in my life that every time I use them they make me ridiculously happy. The kind of happy where I exclaim out loud about it, tell everyone I know how great it is, and never get sick of it. I feel this way about my mattress, my face wash, my conditioner, and these pops. I look forward to every pop, and every one delivers on flavor.
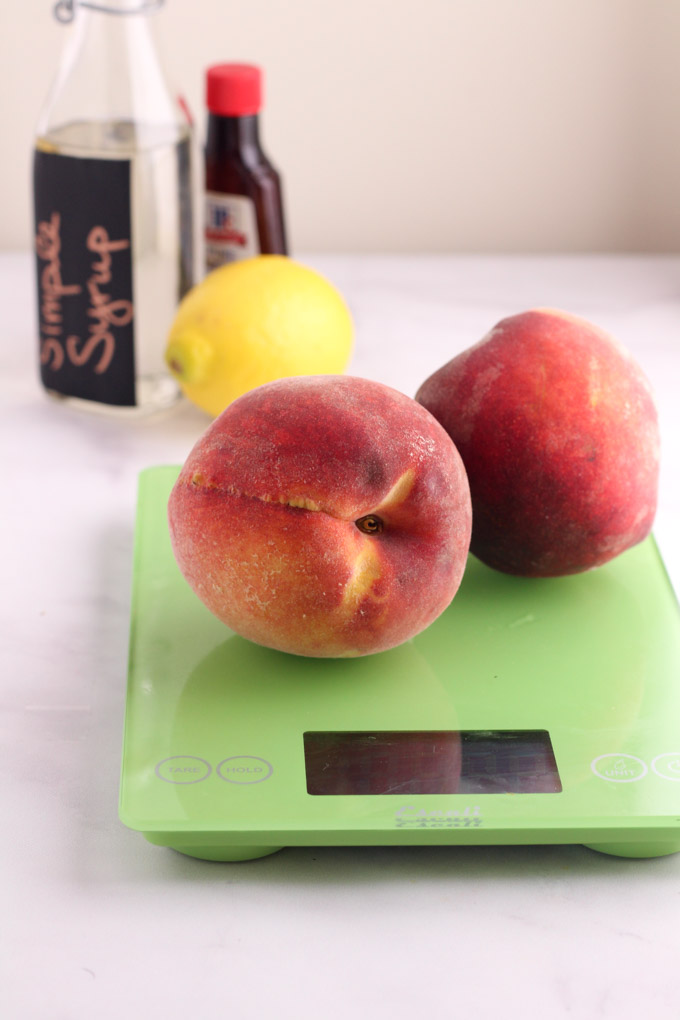
It’s also delicious with whatever kind of peaches you have. I’ve done it with doughnut peaches, white peaches, and yellow peaches. All crazy good. To pile on a little more love for roasted peach pops, let me say this recipe is so easy to make. You need five ingredients: peaches, water, sugar, lemon, and vanilla extract. With that, you’ll make an ice pop that feels like summer and tastes like a peach cobbler.
Do not underestimate the importance of roasting the peaches. Yes, you could use the peaches raw, but I urge you not to give into laziness. When roasted, the peaches are softer, sweeter, and they start to release the most beautiful sticky ruby juice. Twenty minutes in the oven and the whole flavor is elevated. A splash of vanilla then adds a warm flavor that will remind you of your favorite baked goods. The flavor is decadent, but the caloric intake is not.
While I’ll miss summer’s long evenings, cookouts, and pool parties, I can still get my taste of summer with roasted peach pops. My freezer is currently stocked full, and the sunshine they bring makes it easier for me to look forward to fall. Soon, I know I’ll be gushing over pumpkin spice everything, roasting various squashes, and throwing cranberries into my breakfast smoothies. But for now, I’ll hold on to summer just a little bit longer. And you should too. Go makes these pops!
Adapted from People’s Pops.
Messy level: There is a little cooking involved, but all of it easy and largely hands-off. I do have one piece of advice though. If you’re using an immersion blender make sure to wait until everything is fairly cool and then blend in a deep bowl. A shallow bowl with hot peaches and simple syrup means tiny molten droplets of puree will likely hit your skin and hurt. Not that that’s ever happened to me…
- 1 pound 5 ounces/ 595 grams peaches (about 4)
- ⅔ cup/ 150 grams sugar
- ⅔ cup/ 158 ml water
- 2 tablespoons lemon juice (from about 1 lemon)
- 1 teaspoon vanilla extract
- Preheat oven to 350°F/180ºC.
- Cut the peaches in half and put cut side down on a rimmed baking sheet. [Note: if it's hard to get the pit out, just leave it. It'll come out easily once the peach is roasted]
- Roast for 20 minutes.
- Meanwhile, put the sugar and water into a small saucepan. Heat over medium-high. Bring to a simmer and stir occasionally. It's done when the sugar has dissolved. You've just made simple syrup! Remove from heat and let cool slightly.
- Once the peaches are done, remove from the oven and let cool slightly. Remove any pits.
- Put the peaches, simple syrup, lemon juice, and vanilla extract into a blender, food processor, or a deep bowl if using an immersion blender.
- Blend until evenly pureed.
- Transfer the puree to a pitcher or measuring glass with spout. You just want something that makes pouring easy.
- Pour puree into ice pop molds. Be sure to leave a little space at the time so the puree will have remove to expand when frozen.
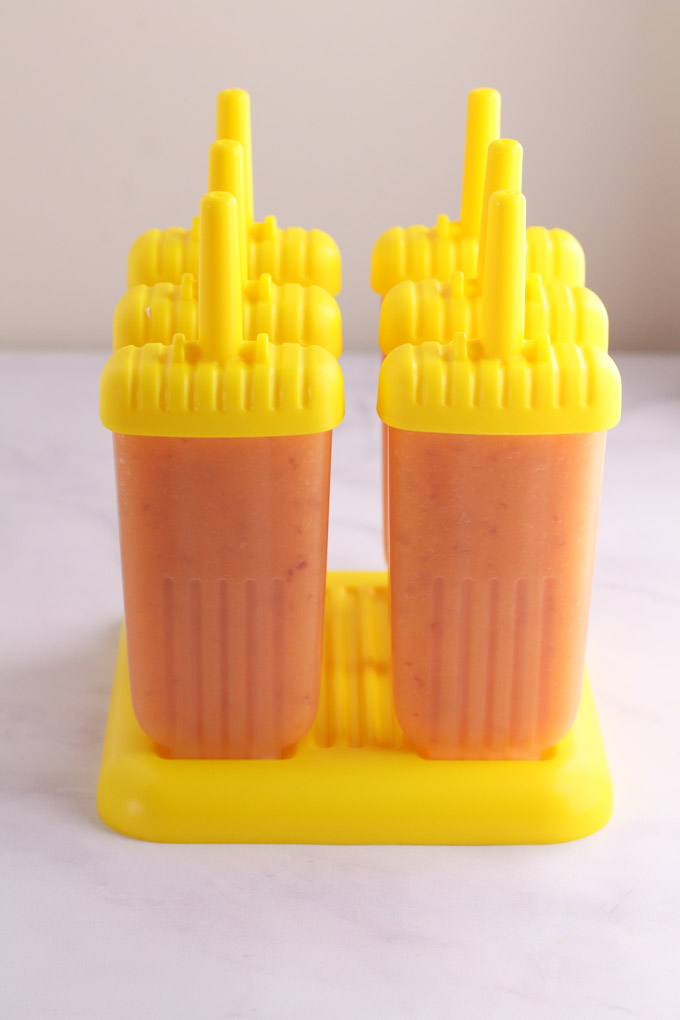
- Add the sticks and put in the freezer until frozen, about 6-8 hours.
- When ready to eat, either run under warm water until easy to remove, or leave on the counter for 10 minutes. Try to be gentle and patient, otherwise you might break them when removing from the mold.
- Eat and enjoy!
The post Roasted Peach Pops appeared first on Cooking is Messy.
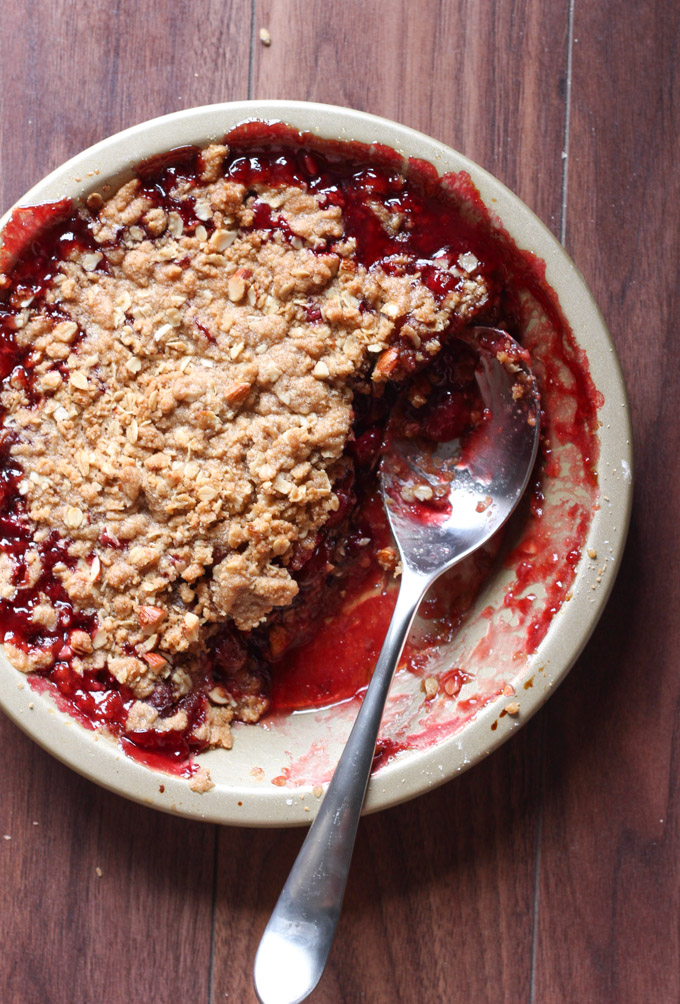
]]>The post Not Too Unhealthy Cherry Crumble appeared first on Cooking is Messy.
]]>
I have had a truly decadent July. After three weeks off, I’m back to work today. Over the past couple of weeks I’ve done lots of cooking and reading, I went to London, and I spent a week at the beach. It’s been wonderfully indulgent. But now, it’s Monday and I’m back to reality – work, gym, and eating well. At least that’s the plan.
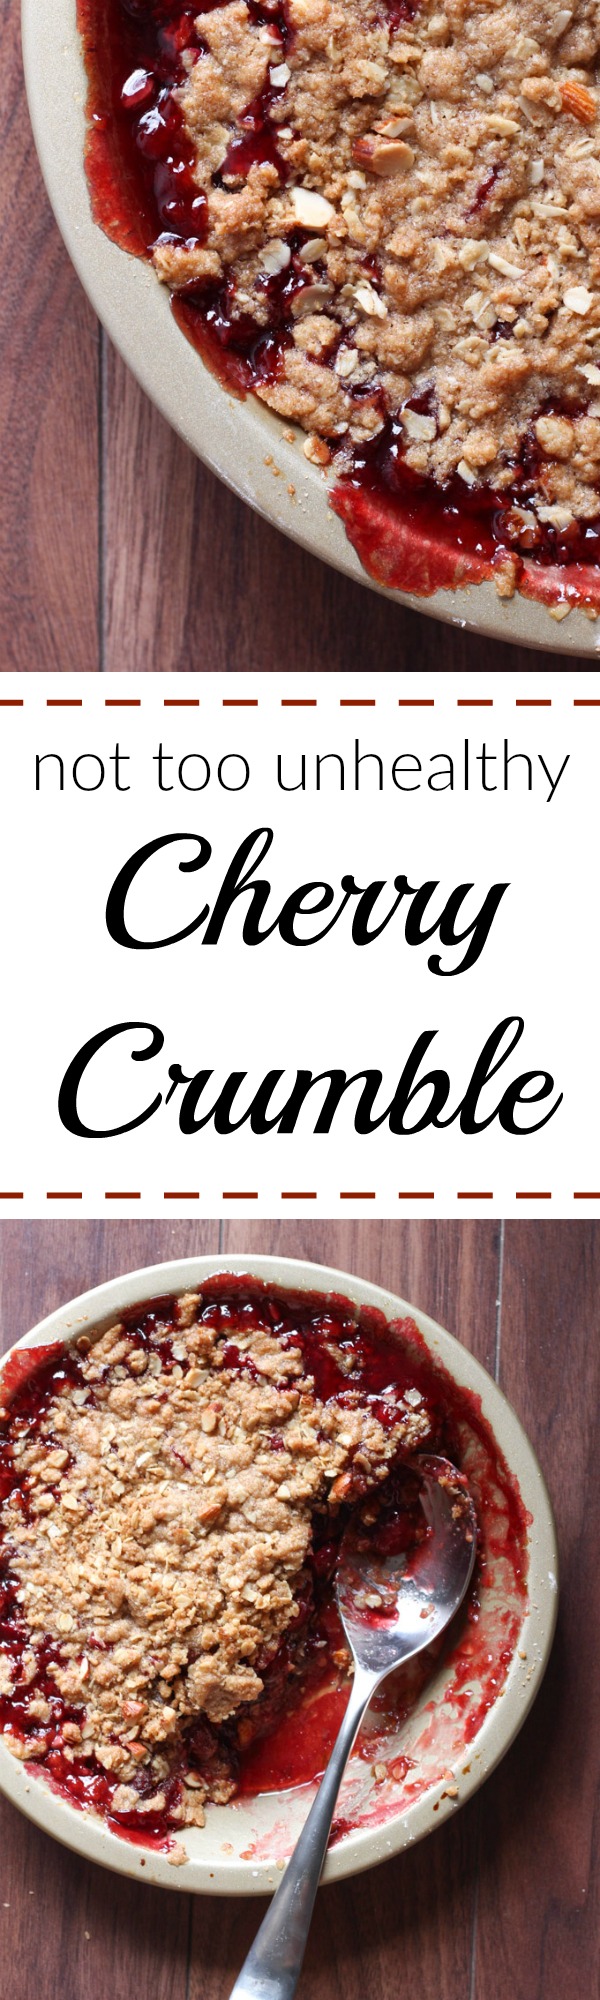
However, before I go into health mode, I wanted to share this recipe for a not too unhealthy cherry crumble. It’s delicious without being an over-the-top super sickly sweet dessert.
The reason for my upcoming health kick is two fold. First, generally it’s a good idea to get some exercise and eat well. This month I have not been exercising at all. The step count on my Fitbit is at an embarrassing low! When I was a the beach I was barely cracking 6,000 steps, and my usual is in the high teens!
The second, and most important reason, is that I’m going to be a bridesmaid next year. When I was in London, I went dress shopping with my best friend Sarah (it’ll be her wedding next spring), and we found a really lovely dress. I won’t tell you more about the dress now, except to say that I really like it, and I want to o make sure I look great in it. So, now I’m going to get in shape and tone up. Now that I’ve told the whole internet my plan, I guess I have to stick to it, right?
My in-person accountability coach is my friend Anna. I think also she might join me in this fitness endeavor. At the very least, I’m putting her on blast to be my motivational partner. Hope you don’t mind.
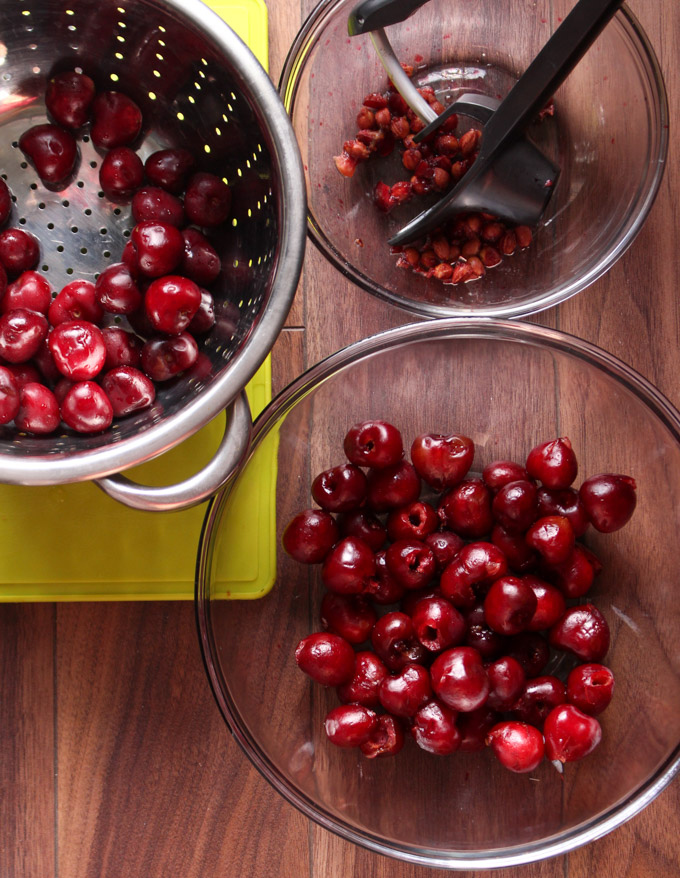
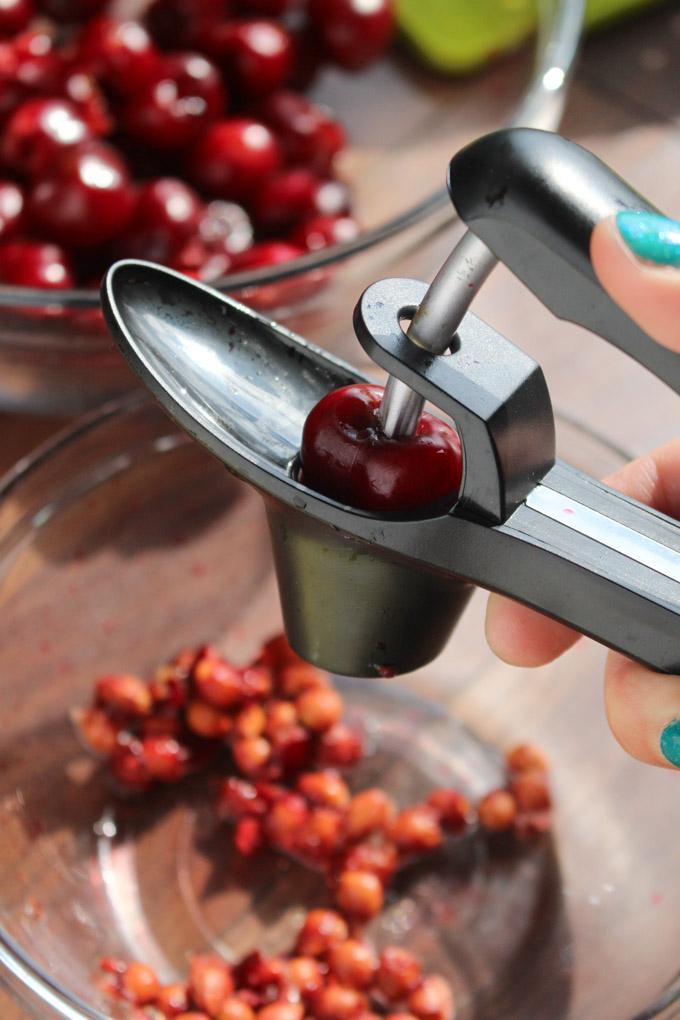
Anna is also the person who gave me the cherries I used in this crumble. It was about to be my birthday, she was home visiting her family farm, I’m a foodie who loves baking – all of that adds up to a perfect present exchange. Also, I’m huge nerd and a quart of cherries gave me the chance to use my cherry-pitter. Let me say, a cherry-pitter is an extraordinarily fun single-use gadget. Basically, it’s a fruit hole-puncher that sharply punches out the pit without making a gigantic mess. I love using it and wish I had more cherries right now just so I could pit them.
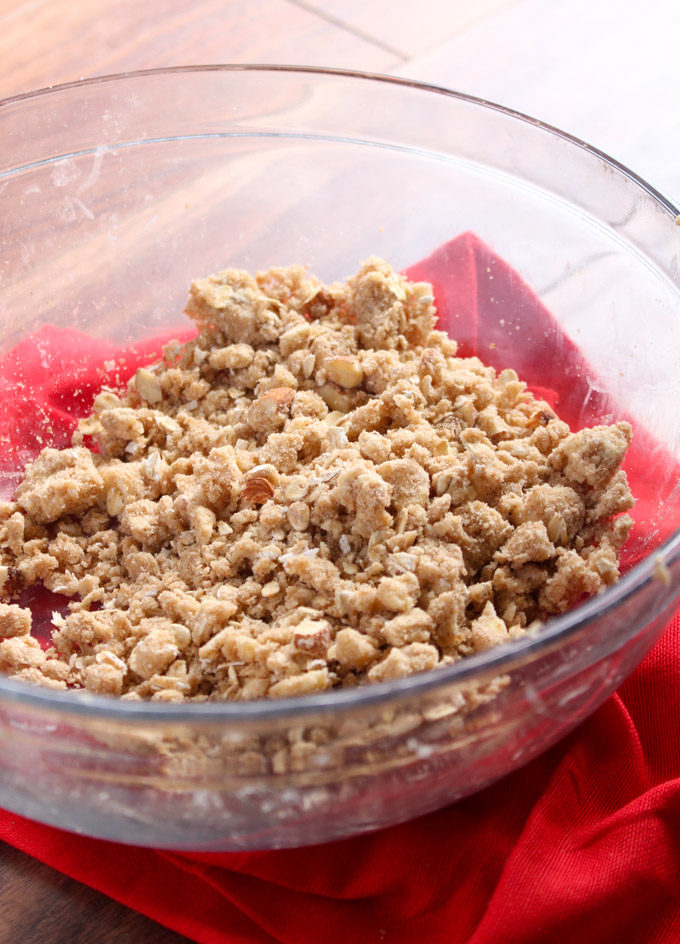
Now because I’m on a health kick, let’s talk about why this isn’t too unhealthy. First, this recipe is mostly cherries. Second, the crumble topping uses whole-wheat flour, oats, and almonds. This gives it a heartier flavor and a bit more nutritional value. However, there is still quite a bit of brown sugar and butter so it’s not a health food. That said, I still had it for breakfast.
The filling’s not so bad either. There’s only a bit of sweetener added to the cherries – and it’s honey. So, while still caloric it’s less processed so that’s a bonus. Again, it’s still dessert, but not so bad for you that you have to feel guilty.
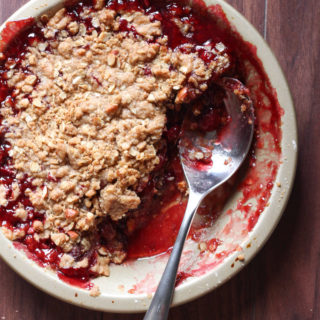
And don’t forget, it’s all about the cherries. Once baked, these sweet gorgeous cherries exude a beautiful ruby juice that thickens into a bubbly, thick syrup. Who cares about healthy or unhealthy when it’s so stunning on the eyes and the taste buds? Not me.

Adapted from Food & Wine.
Messy level: A crumble is so easy and barely messy. When making the topping you’ll get your hands dirty, but it’s the most fun part.
- 1 quart/ 300 grams cherries, pitted and halved
- 1 tablespoon balsamic vinegar
- 3 tablespoons honey
- 2 teaspoons cornstarch
- ¾ cup/ 100 grams whole wheat flour
- ⅓ cup/ 73 grams brown sugar
- ⅓ cup/ 28 grams rolled oats
- ¼/ 30 grams cup chopped raw almonds
- ½ teaspoon salt
- 8 tablespoons/ 113 grams butter, cut into cubes
- Preheat oven to 350°F/180°C.
- In a 9" pie pan, mix together the cherries, balsamic, honey, and cornstarch.
- In a large bowl, mix together the whole wheat flour, brown sugar, oats, almonds, and salt.
- Add the butter to the bowl. Using your hands (or two knives making an X cutting motion) mix the butter into the flour mixture. Be sure to break up the butter into small clumps.
- Cover the cherries with the crumble topping. You might not need all of it.
- Bake for 45-60 minutes. It is ready when the crumble is brown and the cherry filling is bubbling through at the edges.
- Serve in bowls and with a spoon.
The post Not Too Unhealthy Cherry Crumble appeared first on Cooking is Messy.
]]>The post Rice Crispy Treats appeared first on Cooking is Messy.
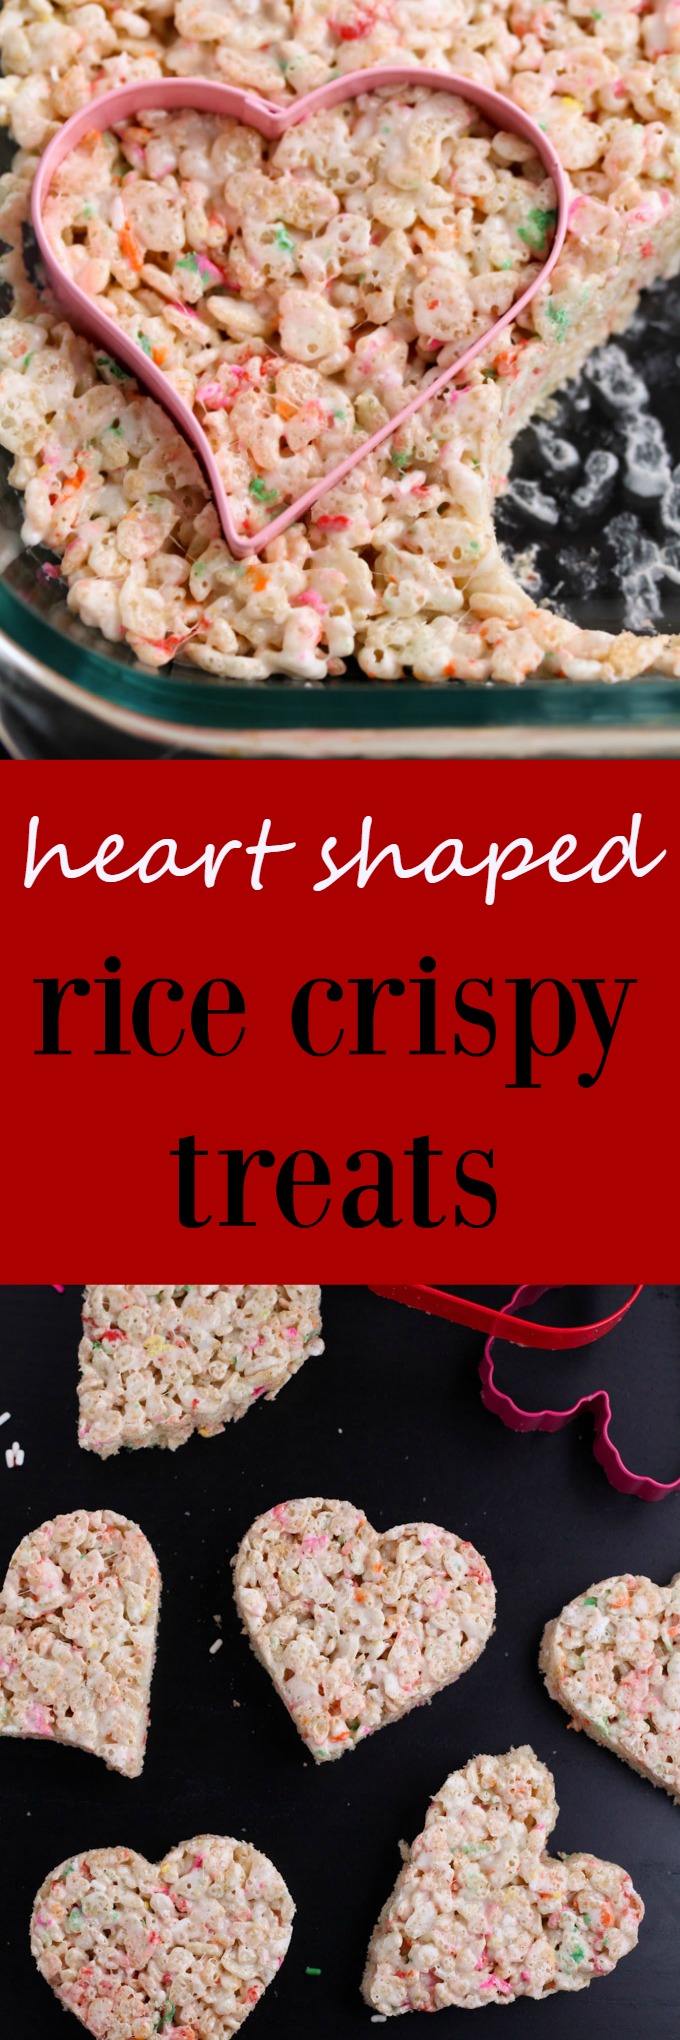
]]> Over Christmas my friends, Ashley and Charlotte, and I made rice crispy treats. While making it we looked at the cereal box and it said something like “your friends will be in awe.” Or something just as hyperbolic. And we laughed because they are just rice crispy treats. Everyone has eaten them one million times. Why would you be in awe?
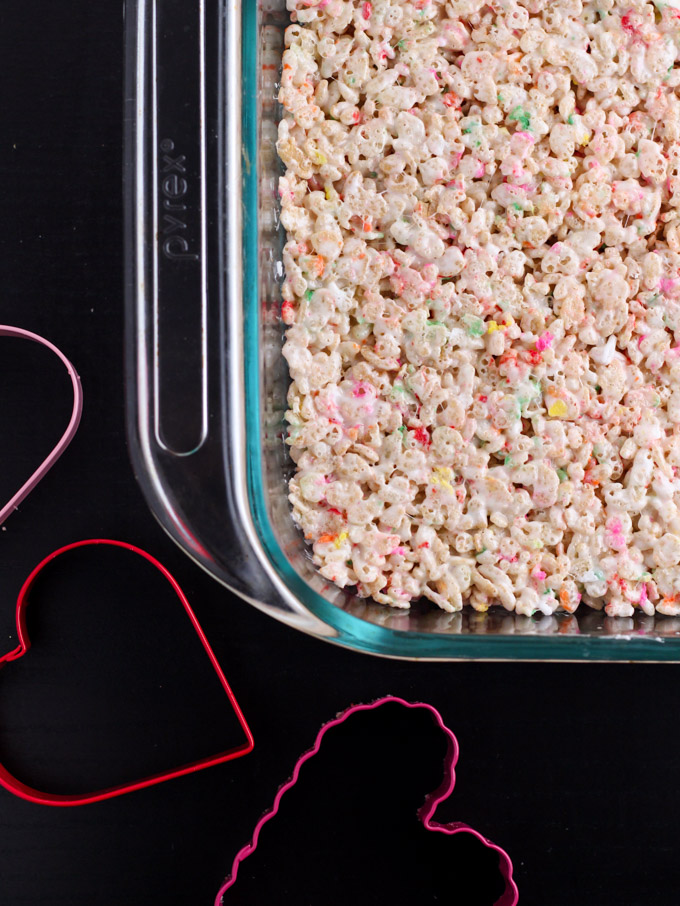
But the thing is, maybe the box was right. I love rice crispy treats. I can’t stop eating them. While awe might be too strong, deep adoration is not. As a kid I always wanted them. They’re what I still like buying at coffee shops and bake sales. Most importantly they’re so simple to make and so easy to jazz up.
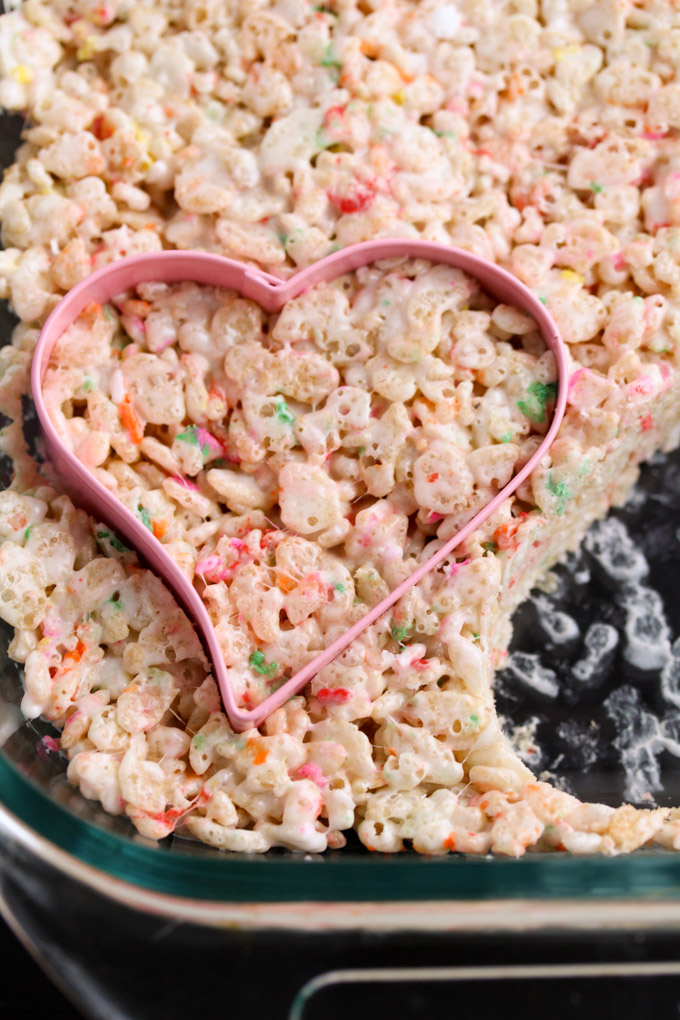
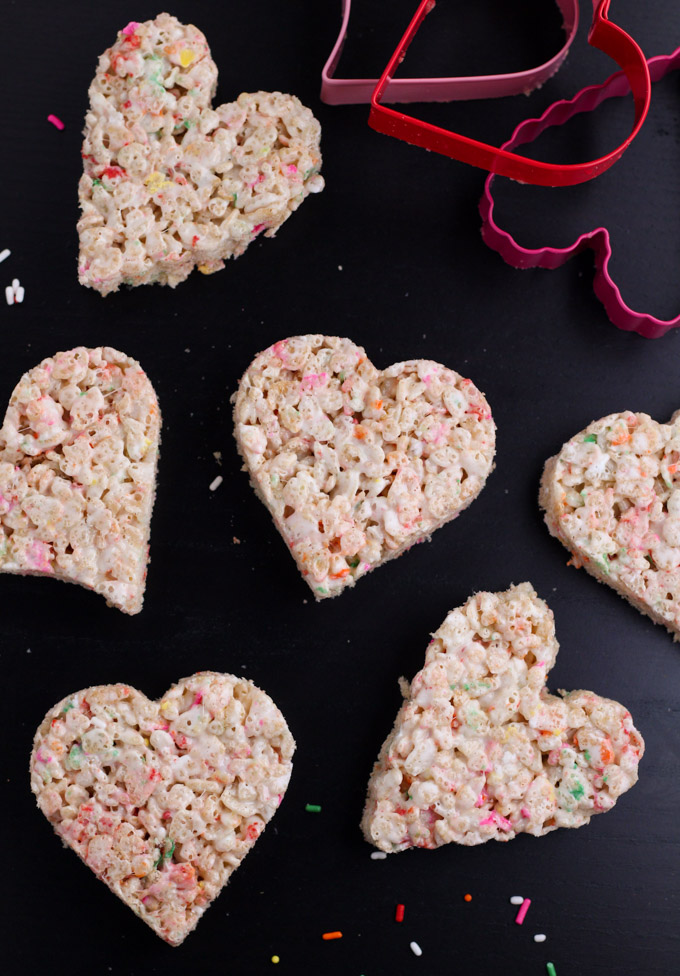
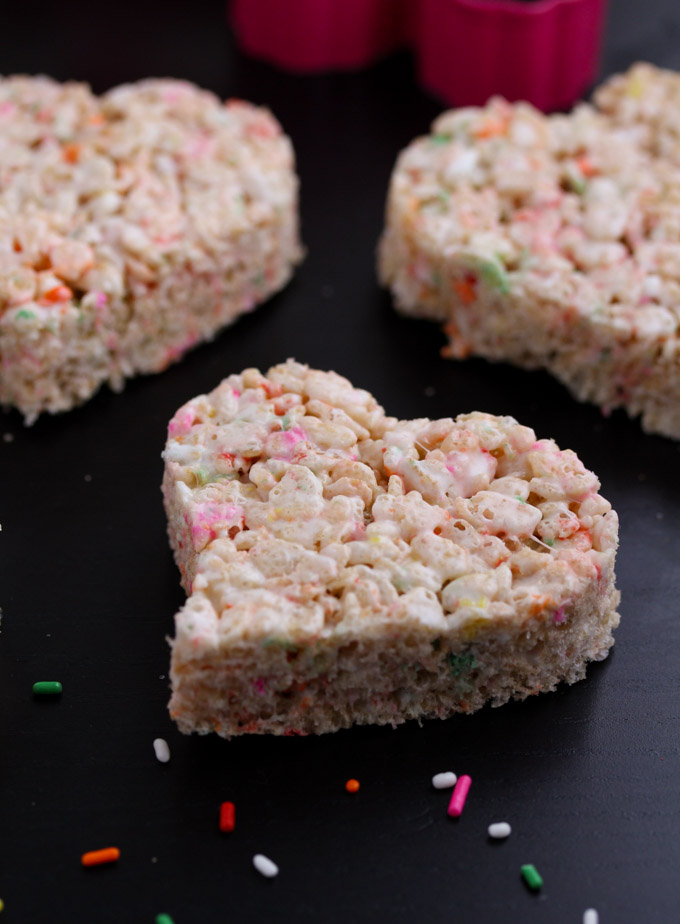
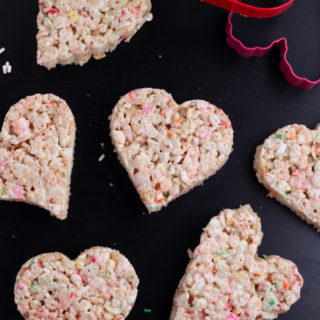
Maybe jazz up is too strong. Basically, I like to throw holiday-themed sprinkles in with the rice cereal. It adds a bit of color and seasonality. Easy peasy right? This year, for Valentine’s Day I’ve taken it up a notch and cut out heart shapes. I have a very nerdy love of cookie cutters, so any excuse to use them is a good one.
With the cookie cutters I made 12 hearts from a 9×13″ pan. There were lots of off cuts, which are perfect for snacking. And obviously tiny pieces don’t count as one piece, so you can eat as much as you want.
Not into hearts and Valentine’s Day? You can use any cookie cutters your like. I think Christmas cutters, circles and other geometric shapes, and anything kind of circular would be good. Elaborate cutters like dinosaurs, snow flakes, animals, and things with thin shapes will be unlikely to hold together.
Rice crispy treats are always going to be a hit. They’re yummy, with sprinkles they’re colorful, and the shapes are sure to please. Perfect for yourself, for your gals, or for anyone you like. Sure to inspire awe, right?
 Messy level: Melted marshmallow can be a bit of nightmare, just be sure to use a big pot and a silicon spatula and you’ll be pretty mess free.
- 4 tablespoons butter
- 10 oz bag of mini marshmallows
- 6 cups for puff rice cereal
- sprinkles, optional
- 3" heart-shaped cookie cutters, optional
- In a large pot, melt the butter over low heat.
- Once the butter is melted add the marshmallows. Stir so that everything is coated in butter. Keep stirring occasionally until the marshmallows are completely melted and smooth. This takes about 5-7 minutes.
- Pour in the rice cereal and sprinkles (start with 1-2 tablespoons and add based on what looks good to you). Stir with a silicon spatula until everything is coated in a web of marshmallow.
- Pour the rice crispy mix into a 9x13" pan. Using your silicon spatula, press the rice crispy mix into the corners of the pan. Press until the mix is flat and feels fairly dense.
- Let the rice crispy treats cool for about 30 minutes.
- Press cookie cutters into the pan to cut out shapes. Use a knife to wedge them and serve.
The post Rice Crispy Treats appeared first on Cooking is Messy.
]]>The post Skillet Chocolate Chip Cookie appeared first on Cooking is Messy.
]]>
Today is Inauguration Day. Over the last few days I’ve seen the sidewalk barriers, port-a-pots, and souvenir stands go up. The traffic and number of people around the city have increased. American flags, shiny black SUV’s, and motorcades are everywhere.
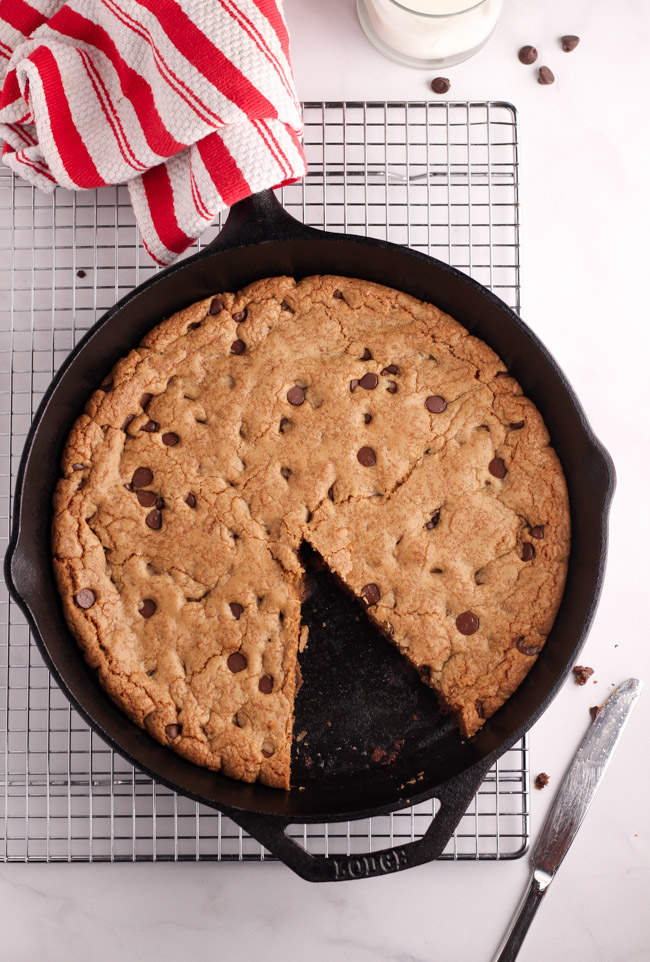
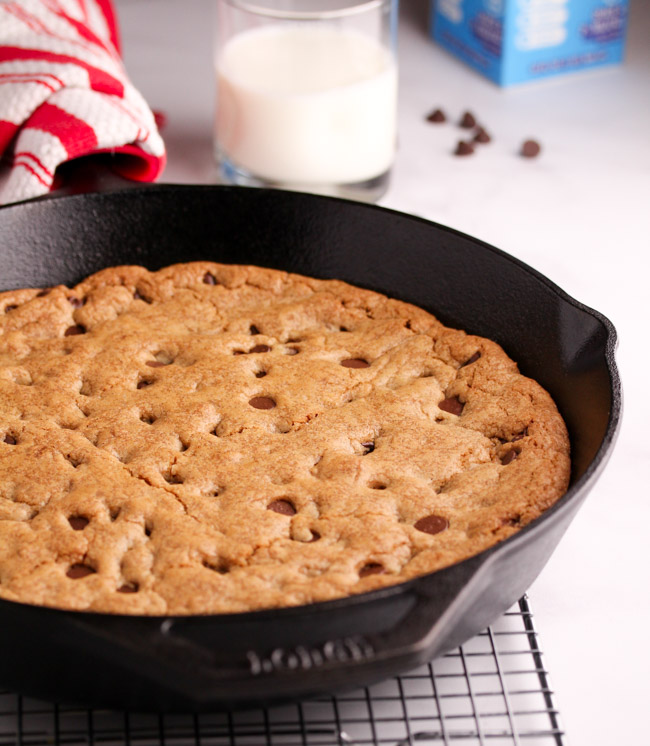
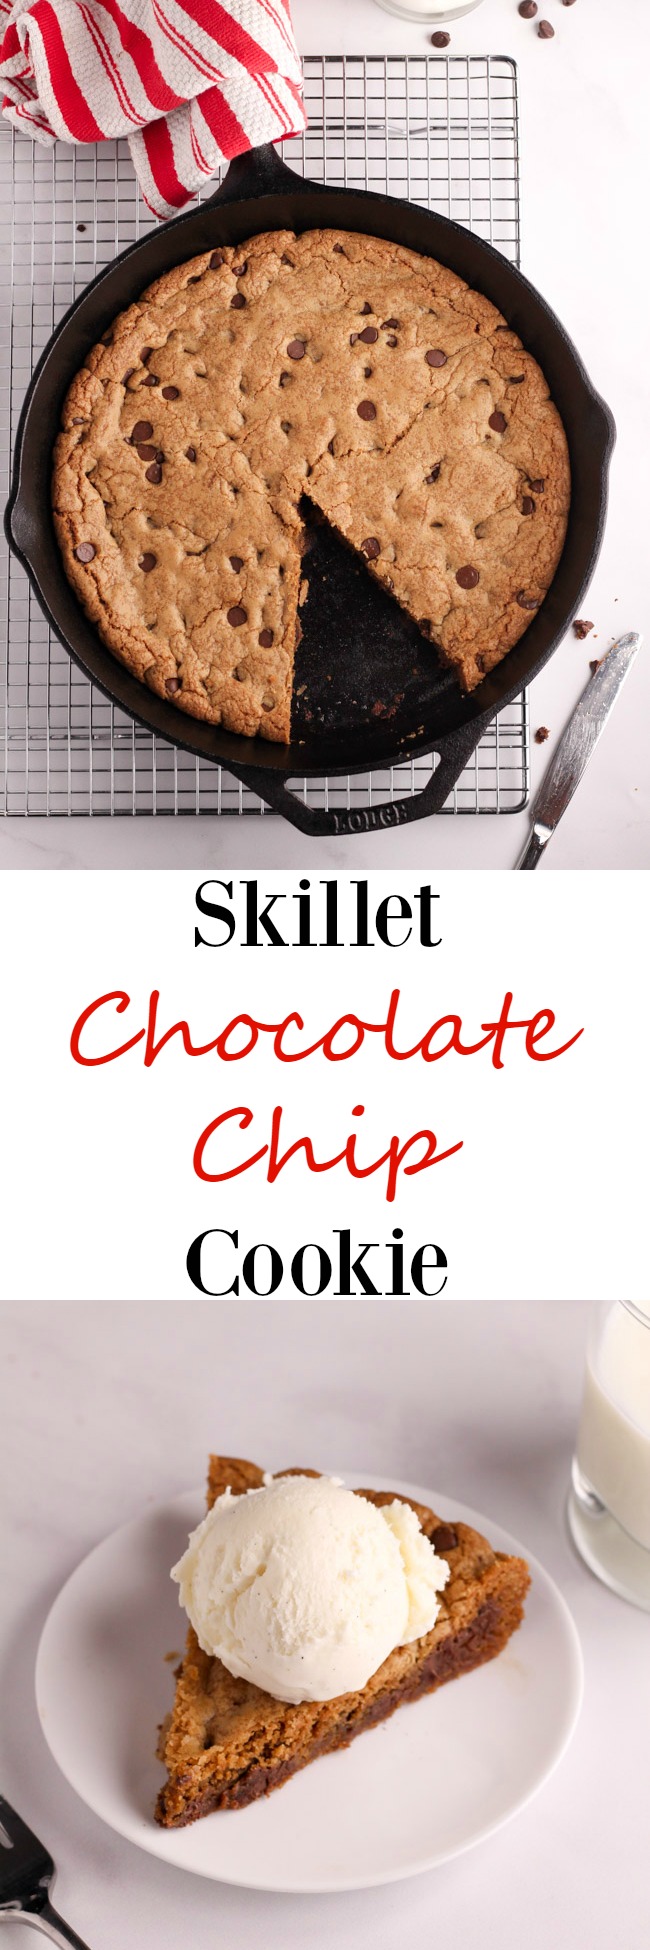
But the best part of today is that I have the day off work. While, I’m pleased to spend the day at home and to hang out in my pajamas – it also feels like a somber day. It’s the kind of day where I could use a really big cookie. A big, wonderful, buttery and rich skillet chocolate chip cookie.
Not only had this election been so drawn out and contentious, it’s making me feel old. Eight years ago I was pretty fresh out of college and had my first job. I was living with my friends Mala and Stacey and were were sharing a small apartment in Chinatown. The world felt exciting, big and full of potential. I was a grown-up living in a big city making my own money!
For the inauguration, Mala and I walked to the National Mall and stood way back by the Washington Monument, chilly and smushed in – but it was worth it. The crowd was happy and excited. Being there on the Mall felt like being part of a community and part of something momentous.
This time, it’s different. There isn’t that feeling of joyous camaraderie. To generalize, there are so many conflicting opinions and emotions and it’s divisive. And what I keep wondering is, how will things change? My whole adult life has been an Obama administration. What will DC and this country look like with a Trump presidency? What I do know, is that in the last eight years I’ve left and returned to DC twice. In that time I’ve learned how much I love this city and this country. And I have to believe it’s all going to be ok, even though today I feel blue.
And so I’m staying in my pj’s eating this skillet cookie. Tomorrow I’ll get back out there, but today it’s all about the cookie. And it’s a pretty great cookie if I do say so myself. The recipe comes from the amazing Cook’s Country book, Cook It in Cast Iron. I got the book for Christmas and have already cooked from it half a dozen times. I’m so in love with the book. I bought a Lodge 12″ cast iron skillet so I could be sure to make every recipe. (Previously I only had a small Le Creuset
one.)
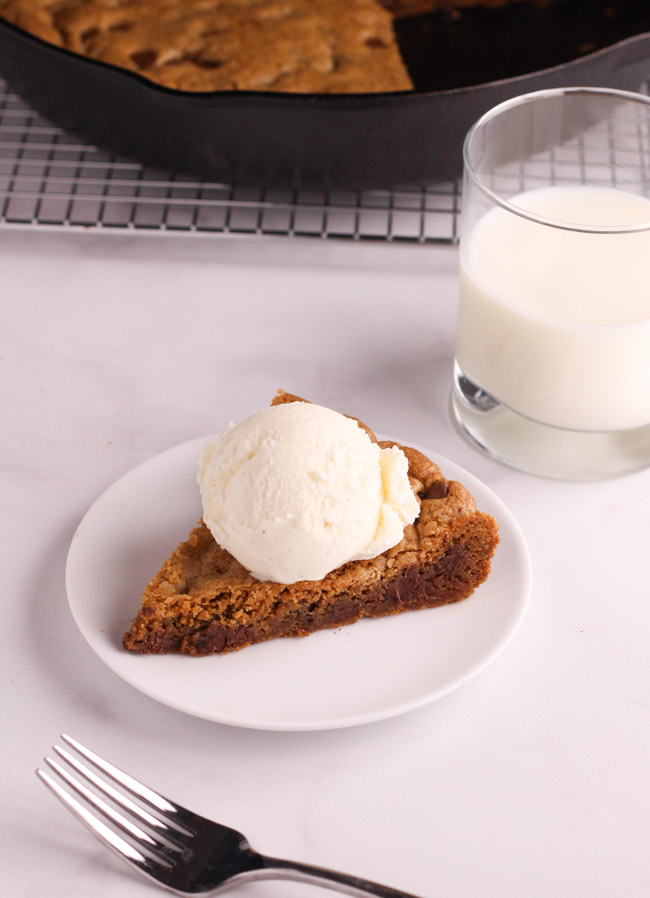
The bigger size is awesome because it makes 12″ of cookie. Now you can eat the whole thing and say you only ate one cookie. It’s also quicker and cleaner to make one cookie instead of multiple batches on multiple trays. Finally, I love the flavor. Crisp outside with a really buttery and slightly nutty with a rich, soft interior. It’s so very good. Top with ice cream (or make an ice cream sandwich!) and you’ve got a treat to make all your blue go away.
Adapted (barely) from Cook It in Cast Iron.
Messy level: I’ve been debating if this is cleaner than regular chocolate chip cookies. I think it is because you only have to make one giant cookie. The biggest potential for disaster is pouring the melted butter into a large bowl. Cast iron is heavy so be sure to have two pot holders (one for the handle and one for the helper handle) so you can safely hold the skillet and pour – this way there’s less of a chance for dropping something heavy and full of hot butter!
- 1¾ cup/ 250 grams flour
- ½ teaspoon baking soda
- 12 tablespoons/ 170 grams butter
- ¾ cup/ 150 grams packed brown sugar
- ½ cup/ 100 grams sugar
- 2 teaspoons vanilla extract
- 1 teaspoon salt
- 1 egg and 1 egg yolk
- 1 cup/ 170 grams chocolate chips
- Heat oven to 375°F/190°C.
- In a medium bowl stir together the flour and baking soda.
- Use your cast iron skillet to melt 9 tablespoons of butter over medium heat. Stir the butter consistently until it gets dark golden brown, about 5 minutes. It will have a nutty smell and the bubbling will go down.
- Pour the browned butter into a large bowl. Then stir in the remaining 3 tablespoons of butter. Stir until totally melted.
- When the skillet has cooled, wipe out any excess butter with paper towels.
- Add the brown sugar, sugar, vanilla, and salt into the melted butter. Whisk until smooth.
- Whisk in egg and yolk until smooth, about 30 minutes. Then let it sit for 3 minutes.
- Repeat (two times) stirring for 30 seconds, then sitting for 3 minutes.
- Fold the dry ingredients into the butter mixture.
- Fold in the chocolate chips. Make sure there aren't any pockets of flour.
- Press the cookie dough into the skillet. Use a spatula or your hand to press the dough evenly into the skillet. You can also press a few extra chocolate chips on top if you like.
- Put the skillet in the oven and bake for 20-25 minutes. The cookie is done when it is golden and the edges are set and slightly darker.
- Let skillet cool on a wire rack or 20 minutes.
- Slice into wedges and serve, preferably with ice cream.
The post Skillet Chocolate Chip Cookie appeared first on Cooking is Messy.
]]>The post Mini Gingerbread House Cookies appeared first on Cooking is Messy.
]]>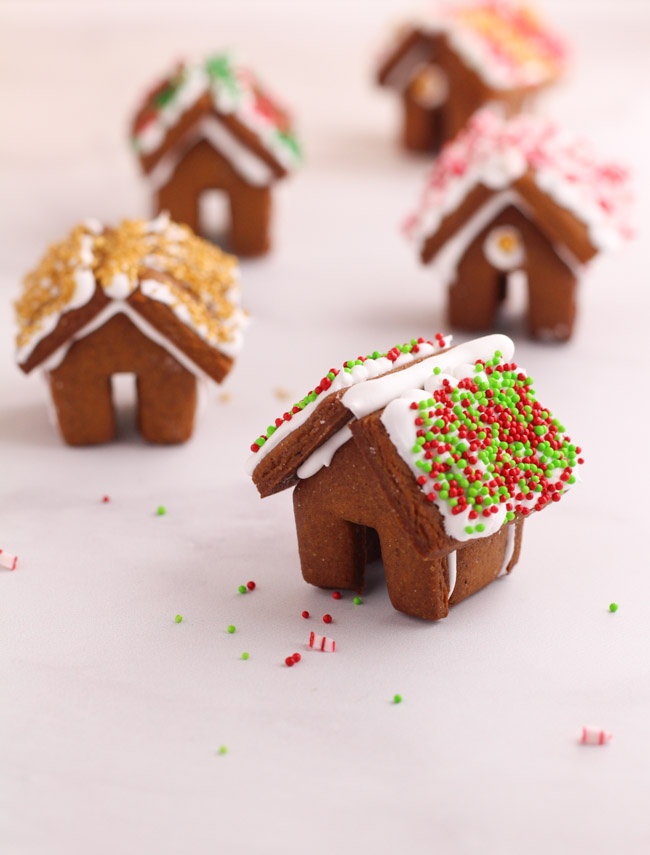
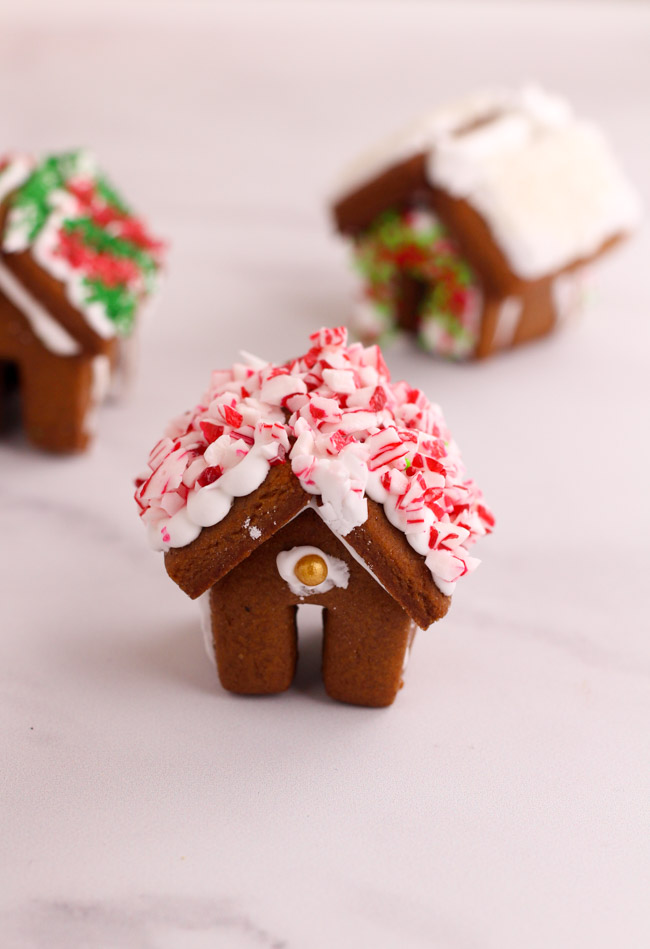
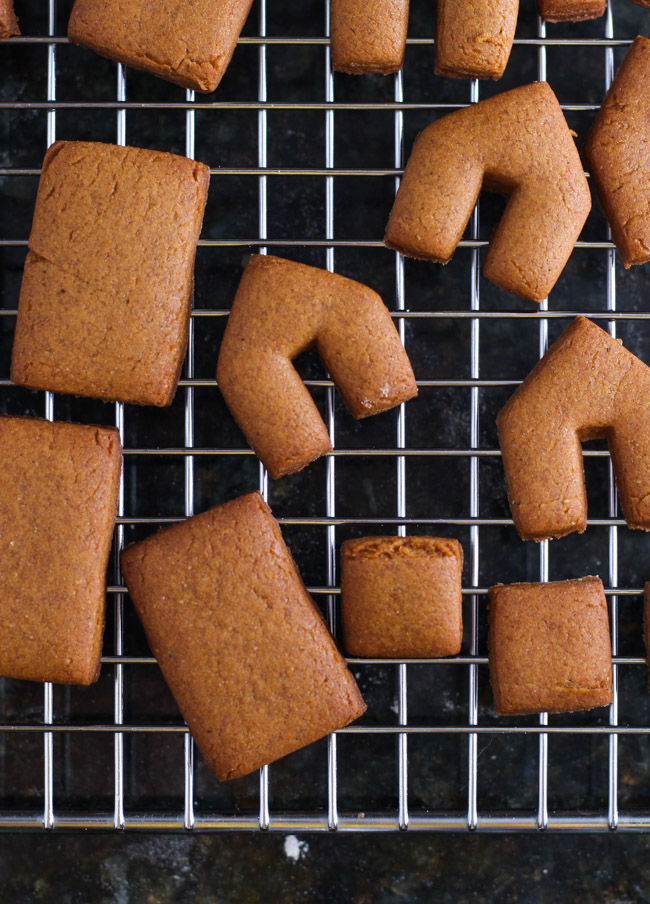
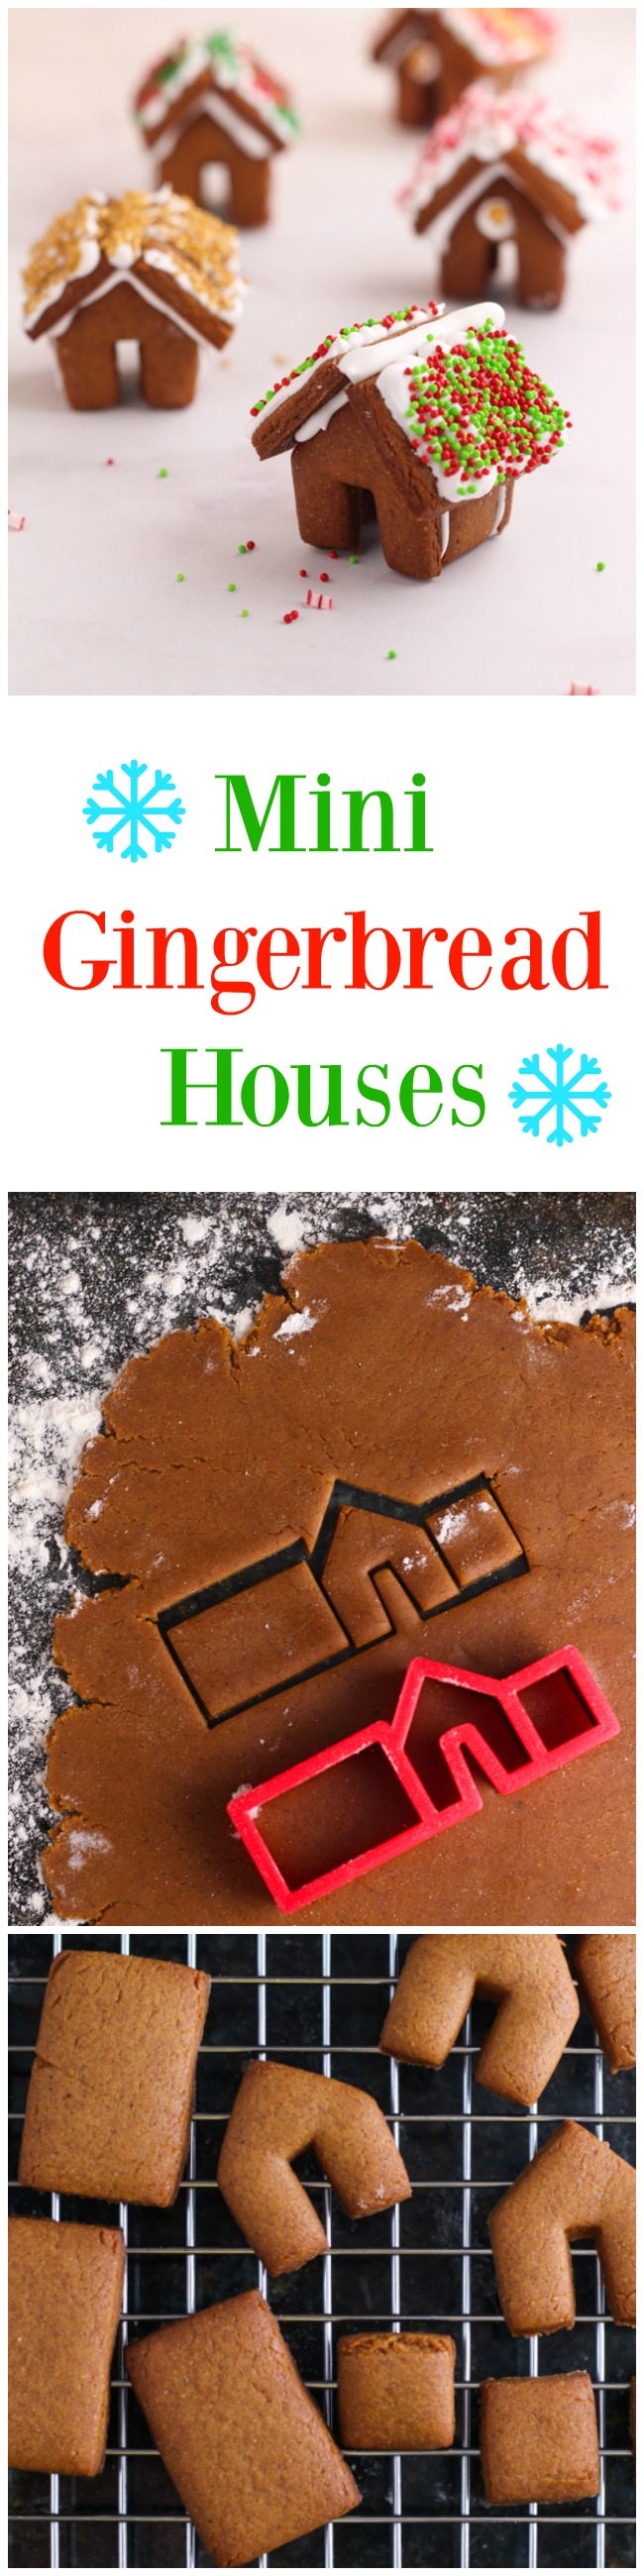
This weekend I’m having a cookie baking weekend with two of my friends. I am so excited! Cookies are my favorite thing to bake throughout the year – and in December it’s my favorite holiday tradition. My friends and I have a long list of cookies we’re going to make tomorrow including this recipe for gingerbread. While this recipe can be used to make any gingerbread shapes you’d like, today we’re focusing on super adorable mini gingerbread house cookies.
I got into mini gingerbread house cookies in part because they are charmingly cute. I also got excited about them because two years ago I attempted a full sized gingerbread house and was disappointed with the end result. Disappointed is a mild word for what I felt. I thought my end result look like an abandoned Christmas house that now people would use on a Halloween haunted forest tour.
I was not proud of that house. And anyway, it collapsed almost immediately. Somehow I thought tiny houses would be easier to get right. And for me, they totally were! Their size makes them cute regardless of design. Plus I figured smaller size could mean easier to stand up. It also means more opportunities to get it right!
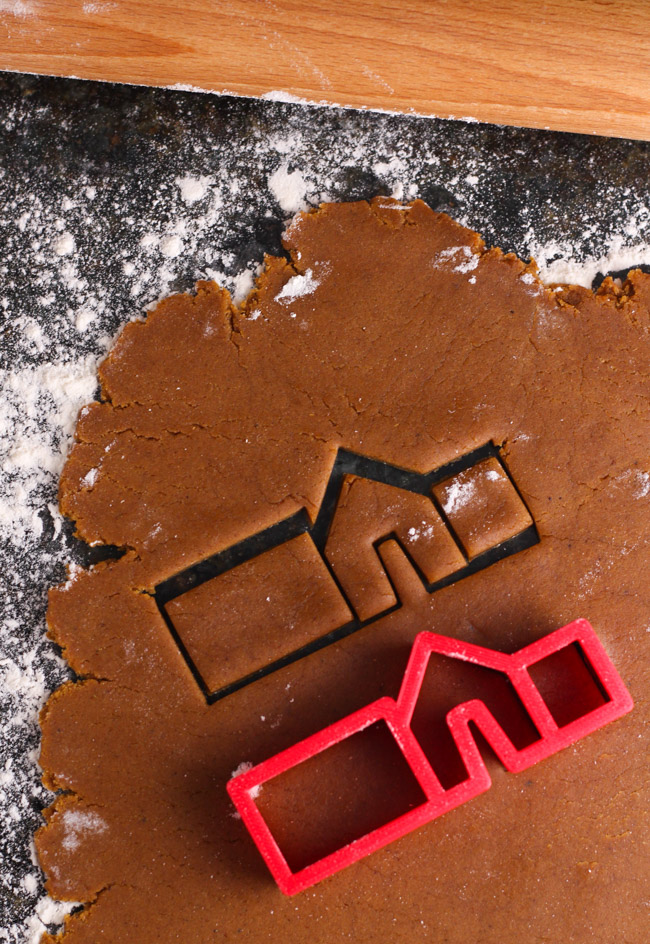
So, I bought this mini gingerbread house cookie cutter and got excited about some holiday baking. If you’re not so sure about buying a cutter you can find a gingerbread house template here. I like the cutter a lot because it’s so easy and quick to use. Two presses of it makes a house and then you put them on your sheet to bake.
I have two more reasons for loving these houses. One, is that I’m not good at precision decorations. I grew up simply throwing lots of sprinkles on sugar cookies and baking them. I am not great with a piping bag and making little swirls and dots and who knows what else.
While I’ve seen some beautiful tiny houses on Pinterest, I also stand by my belief that these houses don’t need a lot of fanfare. They are adorable as they are. My stance: buy lots of beautiful sprinkles, ice these houses wildly, and throw sprinkles on the icing. Job done. They’ll be amazing.
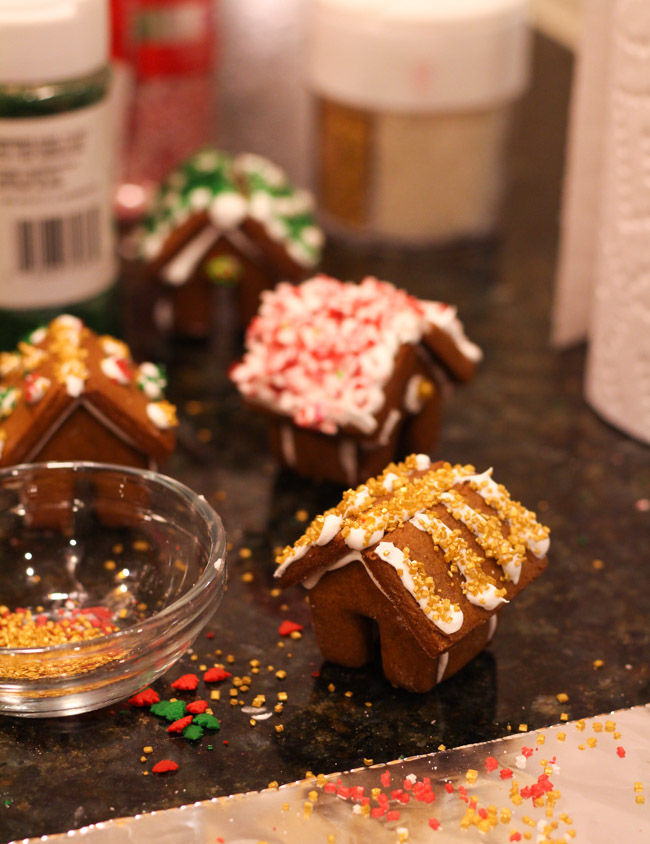 It does however, make for a pretty big mess. I decided to snap a quick photo in the yellow lights of my kitchen, and you can see it above. It doesn’t fully capture the amount of sprinkles on the counter, but it gives you an idea. Just multiply what you see by 100.
Anyway, my decorating plan of attack was this: 1. Put a piece of aluminum foil on the counter 2. Place all the roofs on the foil. 3. Ice the roofs and decorate wildly 4. Let them dry. 5. Assemble the houses 6. crumble up the foil and throw it away. 
The last reason I love these houses are because they can hang on the lip of a mug! The cuteness just keeps on going. These houses are delicious alongside cocoa or coffee. It’s such a happy holiday treat. This recipe will make about two dozen houses, which means you can keep some for yourself and give some as gifts. I brought these two work and while some were eaten immediately, some were lovingly kept for a few days because they were so pretty.
While I’m not generally good at piping or decorating, I found these houses so much fun to make and assemble. Can’t wait to do it again this weekend with my friends. And I think, maybe it’s going to be my go-to holiday bake. What’s your favorite gingerbread recipe or holiday cookie? I’d love to try it!
Adapted from Honestly Yum.
Messy level: The recipe itself isn’t so messy. You will need two bowls and a small saucepan. The messiest part is flouring your work surface to roll out the cookies and then decorating them. While most of the time a kitchen covered in flour and other ingredients annoys me, Christmas cookie baking gets a pass. A kitchen covered in sprinkles feels festive.
- 3⅓ cup/ 420 grams all purpose flour
- ¾ teaspoon of cinnamon
- ¾ teaspoon of ground ginger
- ¼ teaspoon cloves
- ¼ teaspoon of salt
- pinch of nutmeg
- ½ cup and 2 tablespoons/ 125 grams of brown sugar
- ¾ cup/ 255 grams of molasses
- 8 tablespoons/ 113 grams butter
- 8 ounces/ 230 grams powdered sugar
- 2 egg whites at room temperature
- ⅛ teaspoon of cream of tartar
- sprinkles, crushed candy, or whatever you like!
- In a large bowl, stir together the flour, cinnamon, ginger, cloves, salt and nutmeg.
- In a small saucepan over medium, combine the molasses, brown sugar, and butter. Stir continuously until the butter is melted and the sugar has dissolved.
- Stir the liquid into the flour mixture. Fold all ingredients together with a wooden spoon or silicon spatula. As it starts to come together, use you hands to fold in the last bit of dry ingredients.
- Shape the dough into a ball and flatten slightly into a disk. Wrap with plastic wrap and put in the fridge or at least one hour, or over night.
- When ready to bake, preheat the oven to 350°F/180°C.
- Flour your work surface, then roll out the dough to ⅛-1/4" thickness. Line your baking sheets with parchment.
- Use a template or cookie cutter (see info in head note for more) to cut out the house shapes. You will need to use the cutter or template twice to make one house. Scrape up any scraps and re-roll until you've used all the dough. (Or make some houses and some other shapes if you want to use other fun cutters!)
- Bake in the oven for 10-12 minutes.
- Let the cookies cool completely on a rack before icing.
- While cookies are cooling make icing. Sift the icing sugar into a large bowl.
- In the bowl of a stand mixer (or using hand mixer), start to beat the egg whites. Then, slowly begin to stir in the sugar and cream of tartar.
- When the sugar is incorporated turn your mixer to high and beat until for 5-7 minutes or until the icing is white and thick.
- Transfer the icing to a piping bag fitted with a small tipped nozzle.
- Ice one side piece cookie to one front piece cookie. Let those pieces harden and connect completely before assembling the rest of the house.
- Then, decorate the roofs. Cover the roof pieces completely with icing or using the icing to make decorative patterns. Then liberally sprinkle colorful sugar, sprinkles, or crushed candy over the icing. Let dry completely.
- Using the icing as bonding glue, add the other side and back piece to the front and side you already assembled. Then using the icing to add the roof. You can add a line of icing between the two sides of the roof, then add sprinkles if you like.
- Let dry.
- Serve as they are, or on the lip of a mug full of cocoa or coffee.
The post Mini Gingerbread House Cookies appeared first on Cooking is Messy.
]]>The post Election Cake appeared first on Cooking is Messy.
]]>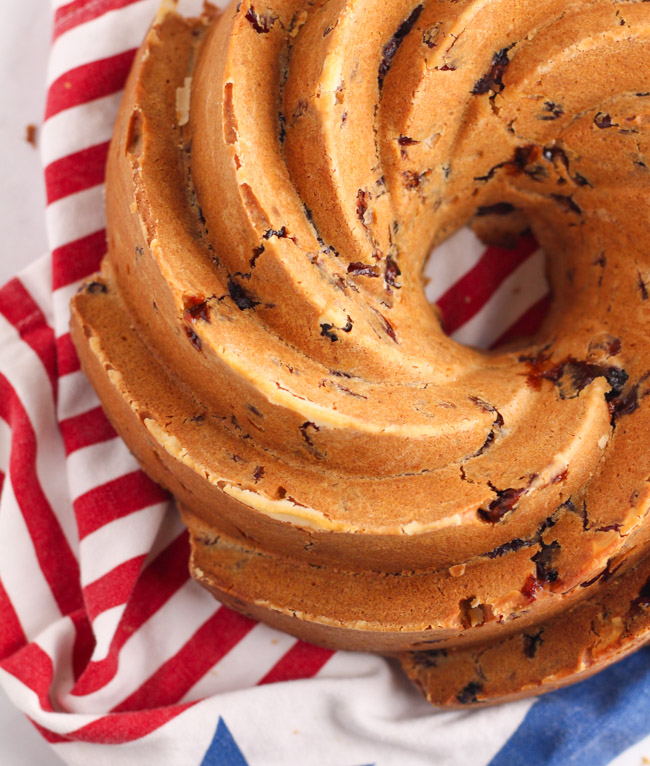
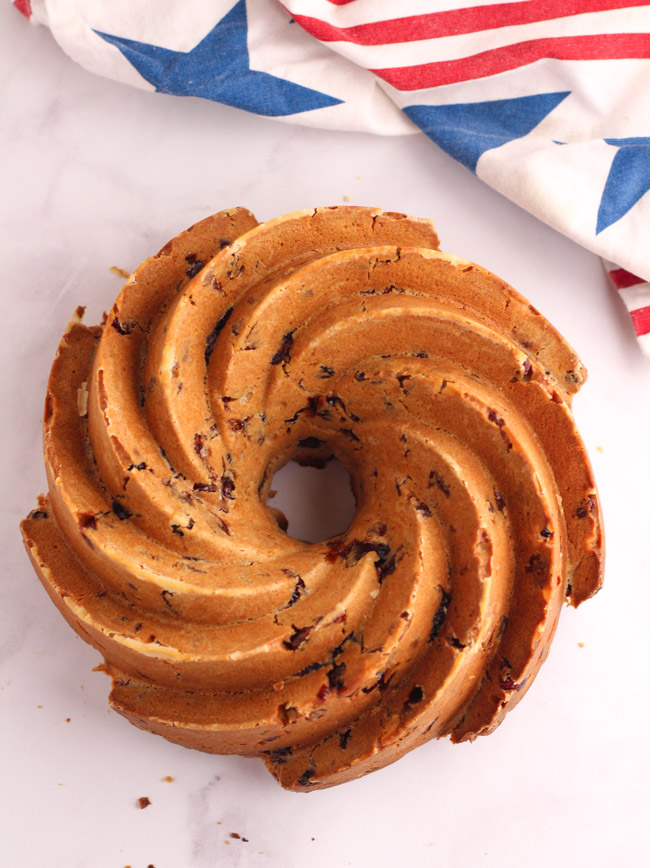
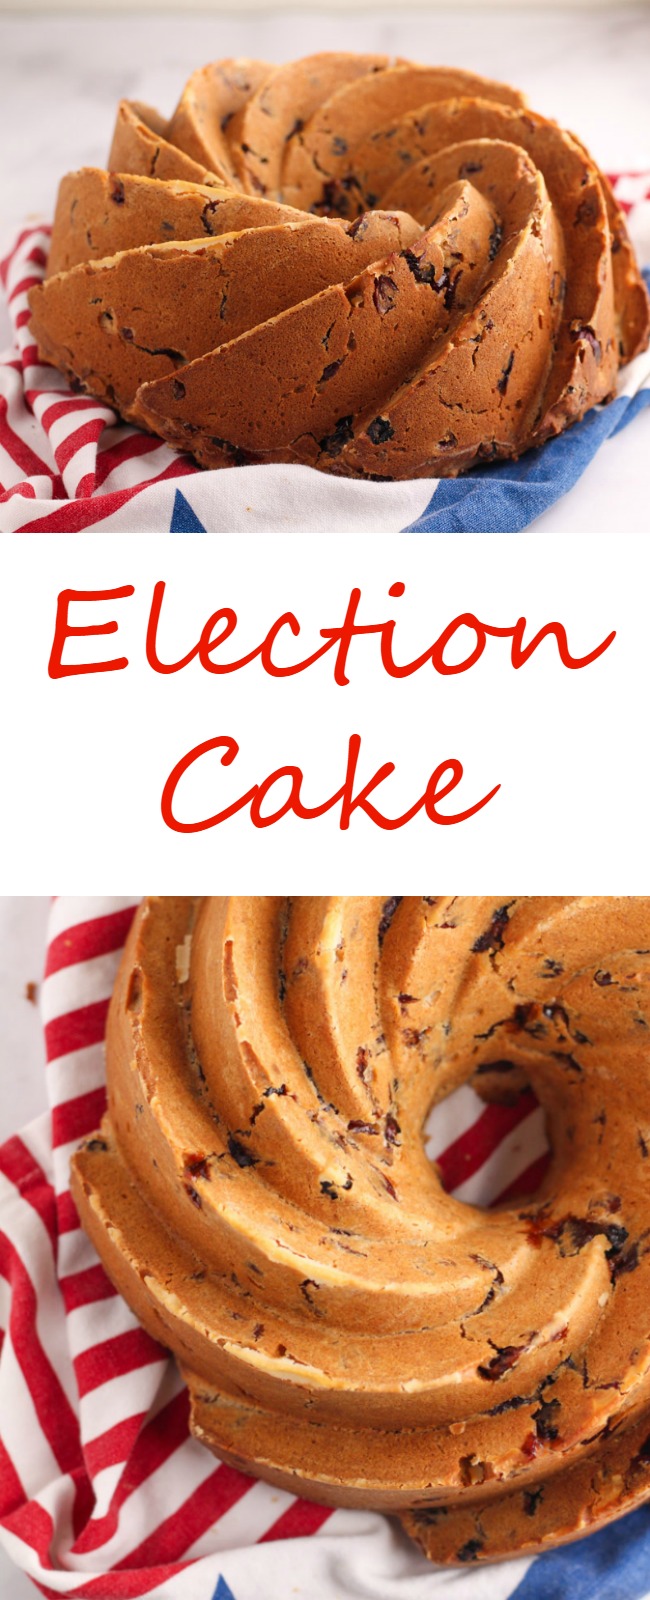
It’s Election Day and I’ve made cake. I’d never heard of election cake before a few days ago. However, once I read about it I had to make it. I love themed foods, and I love a bit of history. The first recipes for election cake date back to the 1790’s when George Washington declined the presidency for a third term. Since this recipe is based on one that’s over 200 years old, it’s not your modern cake. There’s no baking soda or baking powder. It’s made with yeast, dried fruit, spices, and lots of sherry. It’s more of a dense fruit loaf with a great boozy flavor.

I think the boozy flavor is my favorite part of this cake. It’s sweet, plumps up the dried fruit, and makes the cake a bit more moist. Also, after the whole run up to the election who doesn’t need a drink? I’ll be honest, I’m not deeply into politics. I don’t know all the ins and outs on every issue. But I do know that the campaigns have felt endless. Attack ads have flooded every TV commercial break. The whole thing has been so contentious. It’s been hard to watch and hard to get away from. I’m glad it’s over. I look forward to watching the returns tonight as I enjoy this cake and to find out what comes next.
Still, I am excited to vote. I know I could have gone early. I know I’ll be in line forever. Yet, I’m still excited to go to the polls and cast my ballot. Voting is something I’ve only done a few times before, which means it still feels like a bit of a thrill. Maybe I’ll change my tune after a long wait in line, but for now I can’t wait. I feel lucky to live in a place where I can vote, where I can have a voice, and a choice, and an opportunity to debate and experiment and figure it all out.
Hope you enjoy your election day. Hope you get out and vote. And I also hope you get some cake too. Interested in more election cakes? Apparently it’s a bit of a movement. Check out #MakeAmericaCakeAgain for more!
Adapted from OWL Bakery.
Messy level: Not especially messy as nothing is going to explode all over your kitchen. However, there are a lot of steps that take a long time and that has messy potential – and means lots of dishes.
- 275 ml milk at room temperature (about 70°F/21°C)
- ¼ teaspoon instant yeast
- 2¼ plus 2 tablespoons/320 grams all-purpose flour
- 2 cups assorted dried fruit (I used cranberries and mixed berries)
- sherry (use apple cider for non-alcoholic version)
- 2¼ cup/ 280 grams all-purpose flour
- 1 tablespoon cinnamon
- 1 teaspoon cardamom
- 1 teaspoon ginger
- ½ teaspoon nutmeg
- ½ teaspoon cloves
- ¼ teaspoon ground coriander
- ¼ teaspoon black pepper
- 2 teaspoons salt
- 16 tablespoons/226g butter, softened
- ¾ cup/155 grams sugar
- 2 eggs
- ⅓ cup/85 grams whole milk yogurt
- ¼ cup/60 grams honey
- instant yeast starter (from previous step)
- 2 tablespoons sherry or apple cider (optional)
- 2 tablespoons all-purpose flour
- 2 cups re-hydrated fruit (from earlier step)
- We're starting with the instant yeast starter. In a large bowl combine the milk and instant yeast. Stir until the yeast is well dispersed in the milk.
- Add the flour to the milk and mix until the flour is fully incorporated. You should have a uniform blob of sticky dough. You shouldn't have streaks of flour or dripping milk.
- Cover the bowl with plastic wrap and let sit for 8-12 hours. It's ready when there are bubbles covering the surface.
- Now for the fruit. Put the dried fruit in a large bowl. Pour sherry over the fruit to cover it. Let sit for 8 hours or overnight. Once fruit is sufficiently soaked to your liking, drain the fruit. (You can keep the liquid if you want but won't need it for this recipe).
- Now for the cake, it's probably the next day or way later the same day. Butter and flour a bundt pan. I did this by melting some butter, brushing it into every crevice. Then I threw some flour around and shook the pan over the sink so the excess flour didn't get everywhere while my whole pan got coated.
- In a large bowl mix together the flour, cinnamon, cardamom, ginger, nutmeg, cloves, coriander, pepper, and salt.
- Using a stand mixer or hand mixer with a paddle attachment on high, cream the butter until very fluffy, about 2-3 minutes.
- Add the sugar and continue to beat until light and fluffy, 2-3 more minutes.
- Turn the mixer to medium speed and add the eggs one at a time.
- Change the paddle to the dough hook. Add the instant yeast starter and mix until incorporated.
- Add the flour mixture to the dough. Mix until just incorporated, be careful not to over mix.
- Toss the re-hydrated fruit with 2 tablespoons of flour. This should help keep the fruit from sinking.
- Using a spoon, gently fold in the sherry (if using) and the re-hydrated fruit.
- Gently pour the batter into your prepared bundt pan. You may need to use your spoon or fingers to even out the dough.
- Let the batter proof for 2-3 hours or until it has risen ⅓ of its volume.
- Preheat oven to 375°F/190°C.
- Bake for 10 minutes, then reduce the heat to 350°F/177°C and continue baking for 35-45 minutes. It's ready when a toothpick inserted inside comes out clean.
- Let cool in the pan for five minutes. Then flip onto a cooling rack. Let it cool completely before serving.
- Slice and enjoy.
The post Election Cake appeared first on Cooking is Messy.
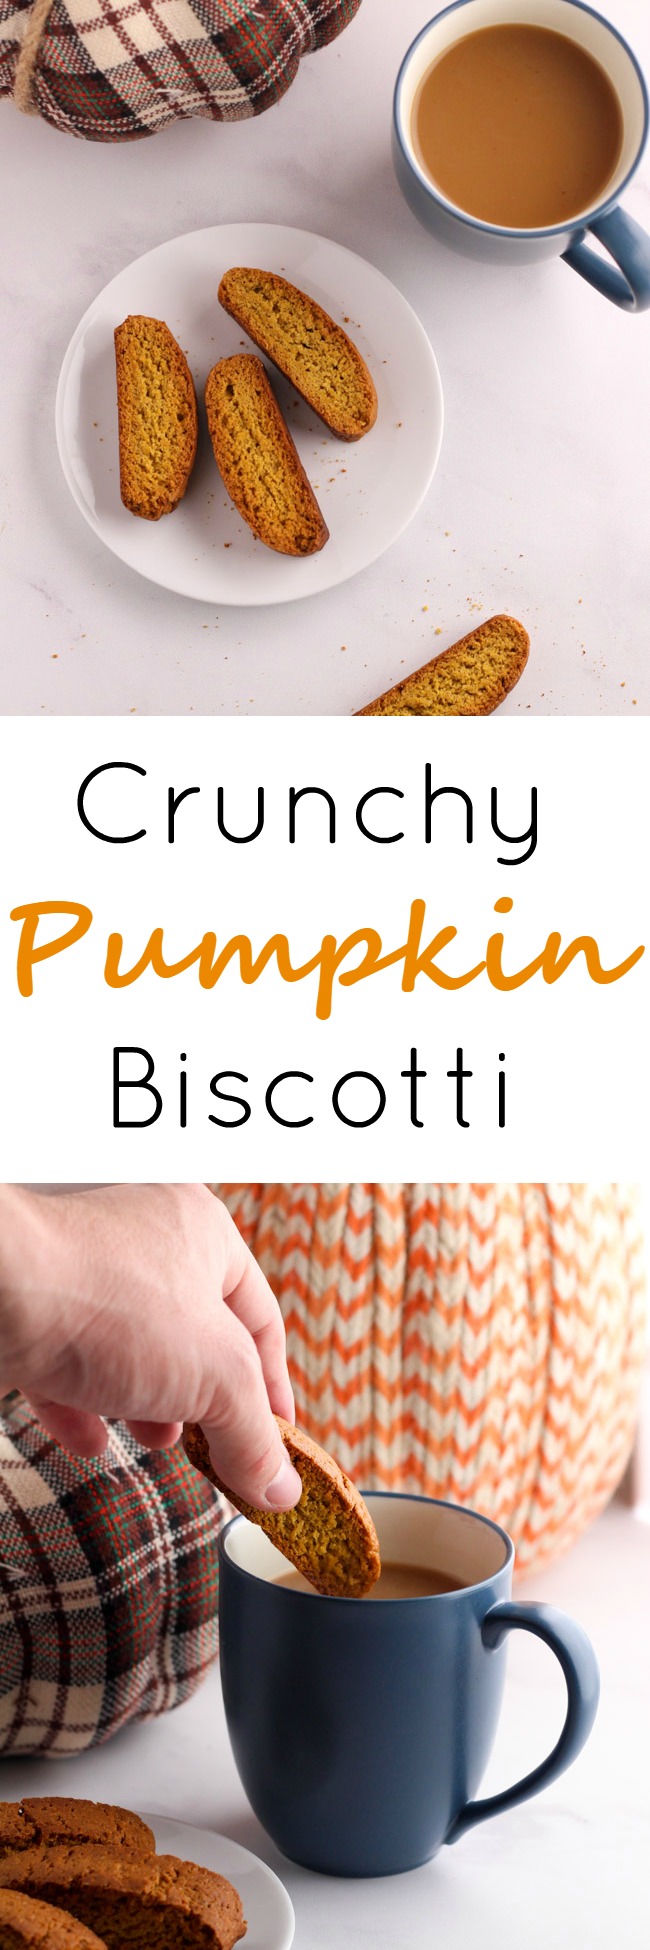
]]>The post Pumpkin Biscotti appeared first on Cooking is Messy.
]]>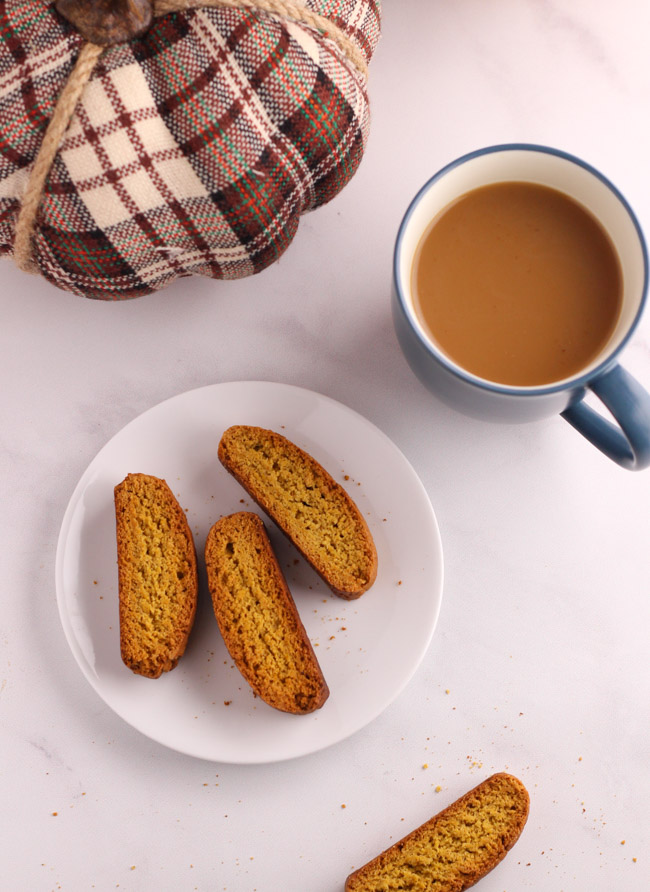
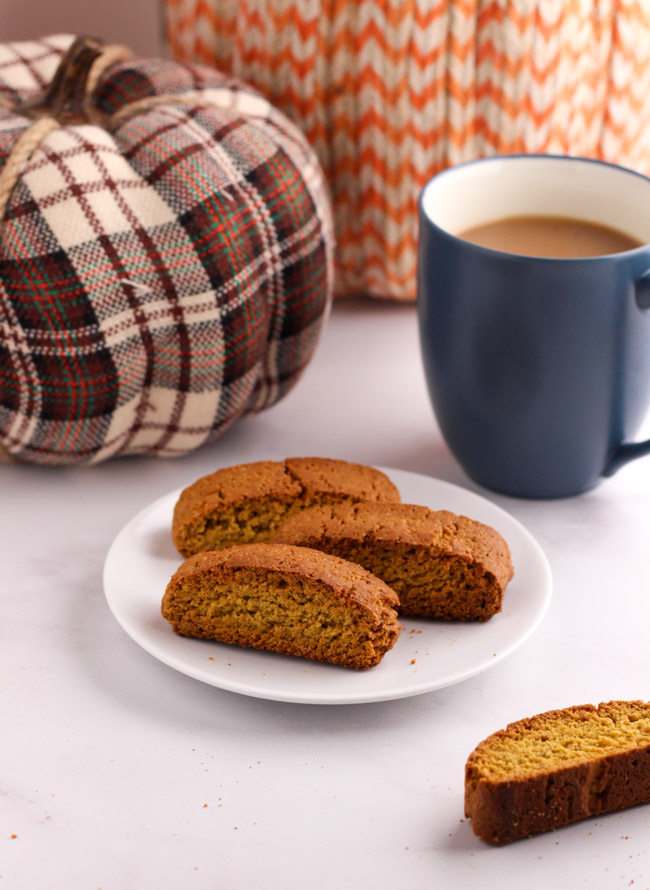
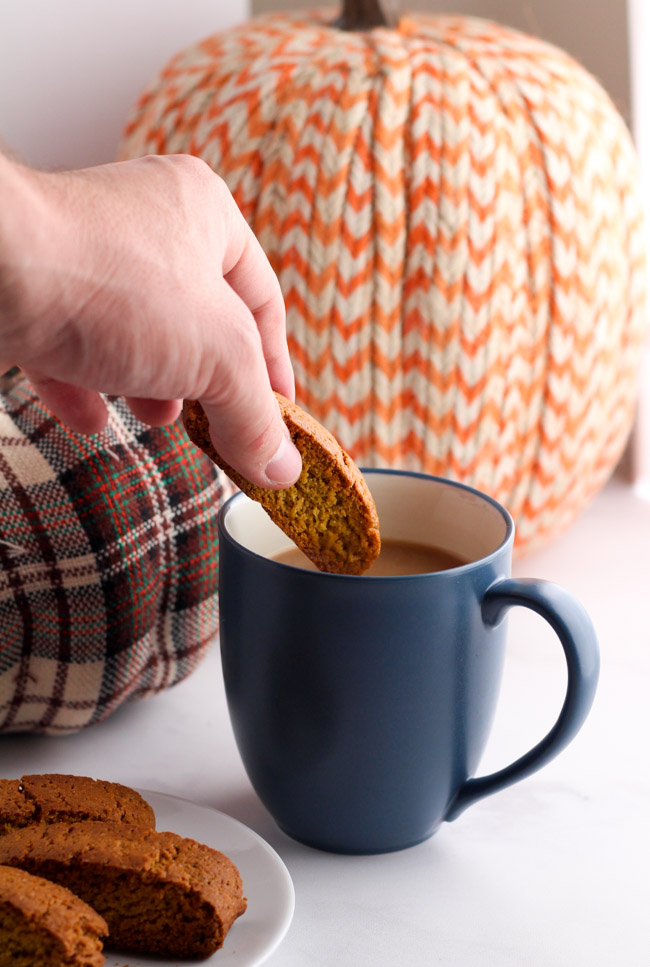
I’ve been a bad blogger lately and largely because I’ve been focusing on work. I know that sounds really fake and ridiculous, but it’s kind of true. School started and I’m back in the classroom and on trips across DC and I come home tired and too lazy to write. I’m sorry friends! However, it’s October and it’s pumpkin season. I couldn’t stay silent any longer because there’s so much yummy stuff to do with pumpkin. For example, this recipe for pumpkin biscotti.
So, a few weeks ago I made pumpkin nutella muffins (a recipe I’ll post eventually!) and I had a little bit of pumpkin leftover in the can. I never know what to do with remaining puree. It’s so little! Throw it away? Keep in my fridge hoping I’ll use it, then eventually throw it away? But then, I found this recipe from King Arthur Flour that needed only half a cup of pumpkin. I scraped the can that had been languishing in my fridge and came up with exactly half a cup. Whew! No need for waste and I was going to get some yummy biscotti.
I had only made biscotti twice before and so when these came out of the oven the second time, I had some fear. Did I really know what biscotti should be like? Were they too crunchy? Can biscotti be too crunchy?! But they tasted good so I wasn’t too concerned.
Then the next morning I had some with my coffee and oh-em-gee friends these pumpkin biscotti were SO. MUCH. BETTER. They soak up the coffee and soften slightly so you can easily bite into them while still holding their shape. They don’t get squishy, fall apart, and plop into your coffee. And somehow, the coffee enhanced the pumpkin and cinnamon flavors. These became my before-work treat for about a week. Who doesn’t want a reason to have a cookie for breakfast? This recipe is a win.
Adapted from King Arthur Flour.
Messy level: The recipe is really easy to assemble with minimal dishes. What also keeps this recipe neat is that all the biscotti can be baked on one tray at the same time. Can’t often say that for a cookie recipe, so it’s a reason to like making biscotti.
- 4 tablespoons/ 56 grams butter, softened
- ⅔ cup/ 130 grams sugar
- 1 teaspoon cinnamon
- ½ teaspoon ground ginger
- ½ teaspoon ground nutmeg
- ½ teaspoon baking powder
- ½ teaspoon salt
- 1 egg
- ½ cup/ 113 grams pumpkin puree
- 2 cups/ 240 grams all-purpose flour
- Preheat the oven to 350°F/180°C.
- Line a baking sheet with parchment paper.
- In a medium bowl, using an electric mixer, cream together the butter, sugar, cinnamon, ginger, nutmeg, baking powder, and salt. Beat until smooth and creamy.
- Beat in the egg and pumpkin puree. Scrape down the sides of the bowl as needed.
- Turn the mixer to low and slowly add in the flour. Mix until just combined.
- In the bowl, gather the dough into a loose ball. Divide the dough in half and place onto the baking sheet. Give yourself space, the dough is sticky and you'll be reshaping it on the baking sheet.
- Shape each half of the dough into a long flat rectangular log, about 10"x2.5".
- Bake the logs on the baking sheet for 25 minutes.
- Remove from the oven and let cool for 5 minutes. Reduce the oven temperature to 325°F/160°C.
- After 5 minutes, use a sharp serrated knife to cut the log crosswise into ¾" pieces. Do your best to cut straight up and down so the biscotti will stand upright during the second bake.
- Arrange the biscotti on the baking sheet so they are standing on their bottom edge and there is a little space between each cookie.
- Bake for 40-45 minutes or until the edges start to turn golden.
- Turn off the oven, crack open the door, and let the biscotti cool completely inside the oven.
- Serve plain, with coffee, or even with nutella.
The post Pumpkin Biscotti appeared first on Cooking is Messy.
]]>