The post Piña Colada appeared first on Cooking is Messy.
]]> Do you ever daydream about being on the beach in the Caribbean, stretched out in a beach chair, soaking up the sun, and sipping on a frozen cocktail?
I do. Especially, when I’m slogging around during the DC area’s hot and humid summers. If it’s going to be uncomfortably hot, I want to be on the beach and be able to jump into the water. But, I can’t just fly off to the Caribbean so sometimes the next best thing is to go to the pool. My apartment building’s pool is on the roof and has a great view of downtown DC, so it provides its own brand of luxurious relaxation.
On a recent Friday, my friend and I were going to be off of work in the early afternoon and we had our hearts set relaxing by the pool. It was a hot and sunny morning, but no sooner did we get back to the apartment and change into our swimsuits that it started to rain. And not a little polite sprinkling that might pass quickly. It was a heavy rain, sheets of rain, buckets of rain – and also thunder and lightning. So there would be no sunshine, no pool, no Caribbean beach – but by golly, there could still be frozen cocktails!
My relaxing beach-inspired Friday was not to be ruined by a little rain. To make it feel like we were at the beach, I even stepped it up a notch and put the piña colada in a hollowed out pineapple. You need to have a special tool for this. If it’s possible to clean out a pineapple with just a knife, I don’t know how to do it.
Now, the pineapple slicer is one of those kitchen gadgets that you see in stores and think WHO NEEDS THIS?! That’s what I think when I see the strawberry huller or avocado slicer. Isn’t that what knives are for? Why can’t people just cut things? But this pineapple slicer is awesome.
Before I had it, I thought, “how often do I even buy a pineapple?” And the answer was almost never because it costs like $7 to get 12 cubes of pre-cut pineapple and $4 for a fresh pineapple. And that $4 pineapple also comes with the fear of cutting off my fingers and hacking at the fruit so badly that it comes out as mush. But, once I got the slicer it made pineapples so easy. Now, I worry it’s a slippery slope that soon I’ll be buying the banana slicer and mango pitter, but so far it’s just the pineapple slicer. So let me show you how it works and then we’ll get to the piña colada recipe.
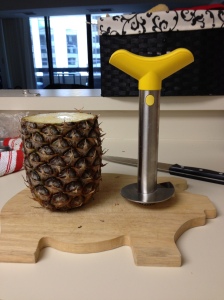
Cut the top of the pineapple off.
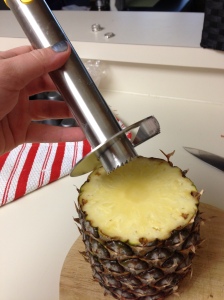
Align the serrated circle at the bottom with the core of the pineapple.
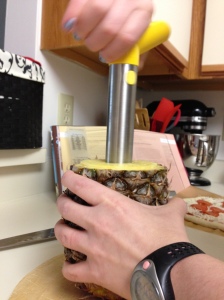
Press down gentle to secure the slicer in the pineapple. Twist the top handle. Keep twisting until you’ve reached the bottom of the pineapple. You can feel it when the blade is getting toward the bottom and you can see when you’ve twisted far enough.
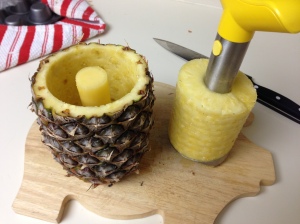
Pull the handle up firmly.
Now you have a beautiful spiral of pineapple and a hollowed out shell.
Awesome right? It’s like opening a bottle of wine, only it’s a pineapple. If you’re going to use the shell for a glass you can get a knife in there and cut out the core, but that’s optional. Now let’s get on with the recipe. Don’t get too caught up on exact measurements with this one because it’s really all about taste. This recipe serves about 4 people.
Ingredients:
Contents of 1 pineapple
1 cup coconut cream
1 cup coconut milk
¾-1 cup rum
Ice (as much or as little as you like)
Pineapple juice (I just added the juice from the fresh pineapple, but you can definitely add more)
Directions:
- Cut the pineapple into pieces that are manageable for your blender
- Add pineapple, coconut cream, coconut milk, rum, and ice. Blend until smooth
- Taste. Add more of any ingredients until the taste is to your liking.
- Pour into glass or hollowed out pineapple. Serve with straw – extra points if you have a curly straw or paper umbrella.

Enjoy! This week I actually am at the beach (in New Jersey – not the Caribbean) so I won’t be posting. Hope you have a great week, I’ll be back after a week in the sun.
 Messy level: Low! Everything gets poured into one place. If you use a pineapple as your glass you don’t have to do any dishes!
The post Piña Colada appeared first on Cooking is Messy.
]]>The post Chocolate Lava Cake appeared first on Cooking is Messy.
]]>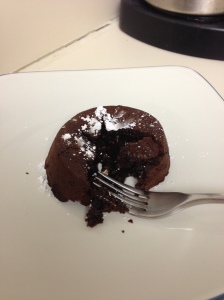 When I was growing up my brother and I got to pick where we wanted to go for our birthday dinner. We could pick whatever meal and whatever kind of place. I grew up outside of Baltimore so sometimes it was a pit-beef dive and many times it was a crab feast at home. But a number of times we went to Roy’s. Roy’s is a Hawaiian fusion restaurant in downtown Baltimore, and the food is really good, but the molten chocolate lava cake is to die for. Sometimes I would pick Roy’s, sometimes Eric would pick Roy’s, and sometimes we’d both pick Roy’s. Our birthdays are only three weeks apart but that lava cake was WORTH IT. Ryan and I even went to Roy’s with our parents the day we got engaged. I have no idea what we had for dinner, but we had lava cake. And yes we were newly engaged, but we didn’t share, because yeah, it’s that serious.
I love sweets and I love chocolate lava cake. At restaurants it always seemed like such a fancy and complicated dessert. Sometimes you have to even order it at the start of the meal. It’s rich, decadent and gooey. How does it get like that? Do chefs inject chocolatey goodness? Is there some complex technique I’d need to master? I was so curious.
And then I did the research and it’s not hard at all. This recipe is a compilation of some recipes I found online. I’m sure Roy’s recipe is more complex, because I found some complex ones. But you can also make a quick, delicious, and impressive chocolate lava cake at home. It’s so darn easy! Also, it’s fairly portioned controlled. Usually when I bake I have one to two dozen of something, then Ryan and I eat too many, and then I take the rest to work and make my friends and coworkers eat too much.
This recipe makes 4 servings. I made two lava cakes the first night (because I only have two ramekins). Then I refrigerated the batter. A day and a half later I microwaved the batter for 20 seconds to make it less firm and then I cooked it according to the directions. They tasted just as good a few days later. Seriously, this recipe is delicious, gooey, and a great indulgence. Remember it’s an indulgence and a special treat and don’t think about the obscene amount of butter, sugar, and eggs.
Ingredients:
3.5 – 4 oz chocolate – I used an 80% dark chocolate bar. You could also use baking chocolate. 3.5 oz is about the size of one bar of chocolate. I used 4 oz to make it more chocolatey.
1/2 cup of butter
1 cup of confectioner’s sugar
2 eggs and 2 egg yolks
6 tablespoons flour
Directions:
1. Heat the oven to 425°
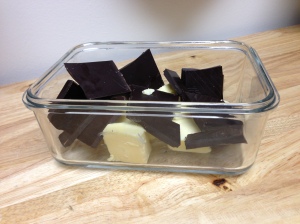
2. Melt butter and chocolate. You can either do it in a double boiler or you can microwave it for 1 minute. I don’t have a double boiler so I used the microwave. Microwave for one minute and the butter will be completely melted.
3. Whisk the butter and chocolate until the mixture is smooth
4. Whisk in confectioner’s sugar. This makes the mix much thicker
5. Whisk in the eggs and yolks.
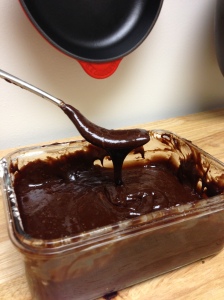
6. Whisk in the flour. It will now be a nice chocolate batter.
7. Spray your ramekins well with butter or nonstick spray. Fill the ramekins about 3/4 of the way full.
8. Cook for 10-12 minutes. It should be a little soft in the middle. The way to tell is the opposite of every other time you’ve baked. Stick a toothpick in the middle and if it comes out a little moist then you’ve still got the gooey center.
9. Once it’s done cooking you have two choices:
Choice A: Sprinkle with confectioner’s sugar and eat from the ramekin
Choice B: Wait 3 minutes for it to cool. Using a pot holder grab the ramekin and flip it over quickly, but gently, to drop the cake on the plate. Everything else I read said to put a plate on top of the ramekin, flip the whole thing over, and then lift the ramekin straight up and off. Ryan and I tried this and it went terribly. We could not get a good enough grip on the ramekin and we ended up with one smashed cake and one askew cake. Just quickly lifting and flipping left us with a clean and nice looking cake. Sprinkle with confectioner’s sugar.
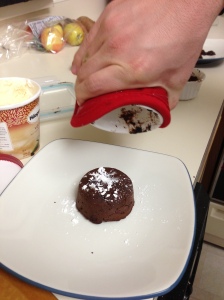
This is an example of Ryan removing the cake from the ramekin. He’s re-enacting as you can tell because I already sprinkled confectioner’s sugar.
 Messy level: Super low! I made the batter in a glass food container. There were almost no dishes and I was able to snap on a lid for easy storage. Make sure to spray your ramekins well because that will also help with the clean up. The ramekin we sprayed the least had the most baked on cake and required a lot of elbow grease to clean.
The post Chocolate Lava Cake appeared first on Cooking is Messy.
]]>